
CSV
CSV imports rows from a spreadsheet export, a web address or an FTP file into your workspace. Use it for lists such as stock, orders or survey responses when the source separates fields with commas, semicolons, tabs or another delimiter.
How CSV works
CSV is one of the formats covered in Files. You first see a sample of the source and choose how to read it. Import saves the rows, column types and parsing choices in the same Organizer item.
After import, use Table controls to search, filter and sort the result. Use Transform to prepare another result or Join to add matching information from another source. Importing a CSV creates its own data; combining it with an existing list is a separate step.
Import a CSV file
Import saves the parsed rows under the uploaded item’s name in Organizer.
- In Organizer, open the menu beside the destination folder and choose File Upload → CSV.
- Select the file on your computer, then open the new item in Organizer.
- Check that the preview has the expected column names and values. Adjust the import settings below if needed.
- Open a column’s menu and choose Data Type to Use when a detected type needs changing. For example, use String for a product code.
- Choose Import in the toolbar. Check the saved columns and row count, and page through the result if it spans several pages.
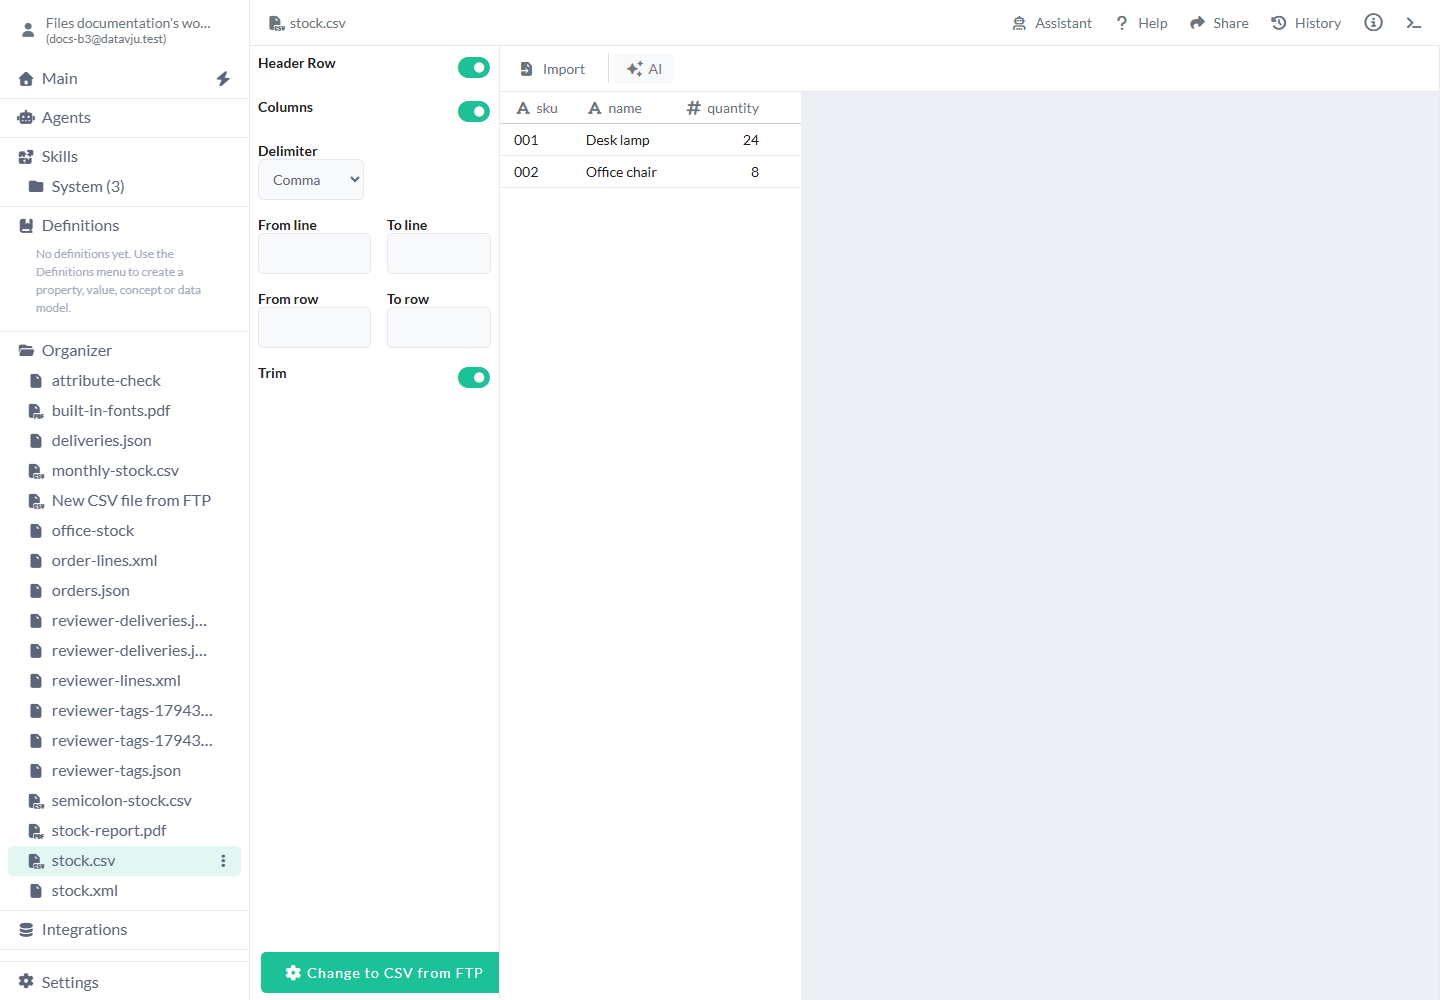
Review the parsing choices before you choose Import.
Read a CSV from a URL or FTP
Use a saved address when the file is supplied by another system.
- For a web file, choose File Upload → CSV from URL in the destination folder’s menu.
- Paste the full file URL into New CSV file from URL. The address must be readable by Datavju; your browser’s signed-in session is separate.
- For an FTP file, choose File Upload → CSV from FTP and complete Host, User, Password, File Path and Secure. Choose Check Configuration, then Use Configuration.
- Review the CSV preview and choose Import just as you would for a local file.
Import settings
Changes update the preview. Defaults below describe a new source; an existing source reopens with its saved choices.
- Header Row - On by default. The first parsed record supplies column names. Turn it off when the first record contains data or when you need to combine several leading header records. For a file beginning sku,name,quantity, leave it on.
- From and To under Header Row - These appear when Header Row is off and start blank. To sets how many leading records become a combined header: 2 uses the first two. Header From is not available yet.
- Join string - Starts blank and appears with the header controls. Set a separator when combining header records: “ / ” combines Stock and Units into Stock / Units. Use an explicit separator and check the resulting names.
- Columns - On by default, giving one column per CSV field. Turn it off to inspect the parsed record alongside the raw CSV line in record and raw columns. Leave it on for an ordinary stock or order table.
- Delimiter - Detected from the file. Choose Comma, Semicolon, Tab or Custom when the preview splits fields incorrectly. For sku;quantity, choose Semicolon. Custom accepts up to two characters, such as |.
- From line and To line - Blank by default, reading the available file. These one-based, inclusive bounds refer to source lines. From line 3 skips the first two lines of a file with a report heading; make sure Header Row still points to the intended column names.
- From row and To row - Blank by default. These one-based, inclusive bounds limit parsed records. With Header Row on, To row 1 keeps the first data record. Use them for a deliberate subset; quoted fields can span more than one physical line.
- Trim - On for a new local upload; off for a new URL or FTP source. It removes spaces around unquoted fields. Turn it on for values such as “ North ” when those outside spaces are unwanted. Spaces inside quoted values remain.
- Detected Data Type - Shown in the column menu before you set an override. It reports the type inferred from the preview. Check important identifiers and mixed-value columns before importing.
- Data Type to Use - No override by default. Choose String for codes or text; Number for quantities; Boolean for true/false values; Array, Object or JSON for structured cell values; or Null for empty output. An explicit choice converts the column, so inspect the result before importing.
- Password - A special Data Type to Use choice for credentials. Preview hides the values; import stores salted hashes, creates a Table and discards the uploaded source. That Table cannot refresh from the original plaintext file. Supply new password text, not precomputed hashes.
- Remove Override - Appears after a type has been chosen. It returns the column to automatic detection. For example, remove a Number override if a source now contains text product codes.
- Change to CSV from FTP and Configure FTP - A local preview offers Change to CSV from FTP; an FTP preview offers Configure FTP. Use these only when you intend to change or check the remote source, then return to preview and import.
Worked examples
Each example creates two data rows. Records used as headers become column names.
Import a stock list
Leave Header Row and Columns on and choose Comma. Keep sku as String and quantity as Number. Import creates two rows; sku retains its leading zeroes.
Source file
sku,name,quantity
001,Desk lamp,24
002,Office chair,8
Imported rows
[{"sku":"001","name":"Desk lamp","quantity":24},{"sku":"002","name":"Office chair","quantity":8}]Read a semicolon export
Choose Semicolon for this stock update. Keep Header Row on. The preview becomes three columns rather than a single line of text; Import saves the two records.
Source file
sku;warehouse;quantity
001;North;24
002;West;8
Expected rows with sku set to String
[{"sku":"001","warehouse":"North","quantity":24},{"sku":"002","warehouse":"West","quantity":8}]Combine two leading header records
Turn Header Row off, set To to 2 and Join string to “ / ”. The two heading records become column names, leaving North and West as the data rows.
Source file
Region,Stock
Office,Units
North,24
West,8
Combined headings
[{"Region / Office":"North","Stock / Units":24},{"Region / Office":"West","Stock / Units":8}]Refresh or replace the source
The imported sidebar offers Reimport for parsing choices, plus Refresh and Schedule for refreshable sources.
- Choose Refresh to read the saved source again with the saved parsing choices. URL and FTP sources retrieve the configured file; a local source rereads its stored upload.
- To change the parsing choices for the current source, open the sidebar and choose Reimport. Review the preview, adjust the settings and choose Import again.
- For a newer local file, open the CSV item’s Organizer menu, choose Replace File and select the new file. A compatible replacement keeps the same item; an incompatible replacement reports an error and keeps the accepted data.
- Choose Schedule to set up a recurring refresh with the shared scheduling controls. Local scheduled refresh still reads the stored upload, rather than watching a file on your computer.
Use Assistant or AI
Assistant can inspect the current CSV, help with preview and import, query imported rows and make supported table changes. Check the resulting table after a change.
The AI button edits an imported CSV when it has a primary key. Use it for a request such as renaming a column or changing rows. Before import, use the parsing controls for delimiters and headers.
Limits and common mistakes
A readable preview can still come from a file with later errors or no data records.
- The preview reads up to the configured sample limit, normally 100 source records. Later records may contain different values or errors.
- A valid header-only file can import as an empty result. A file whose data records are all rejected fails, even if its header is readable. Usable records may import with warnings about skipped records.
- Header From is not available yet. To controls how many leading header records are combined.
- Blank column names are skipped, and columns with the same name can collapse into one column. Give fields distinct, nonempty names in the source.
- An unsuccessful refresh keeps the last accepted rows and settings. Check the source address, parsing choices and column types before retrying.
- A refresh replaces this source’s saved rows; it does not add the file to another table. Use Append, Join or Merge for the relevant combination task.
Related articles
- Files - Choose a file format and compare the ways to bring files into your workspace.
- FTP Acquisition - Connect a remote CSV or XML file.
- Table - Work with imported columns and rows.
- Append - Stack rows from several sources.
- Join - Match sources by shared fields.
- Merge - Combine records using the Merge workflow.
- Schedule - Set up and inspect recurring work.