
Table
A Table stores records you can add and edit in Datavju. Use one for data your workspace owns, such as orders, stock counts or customer requests. Columns define the values you store, and keys and constraints control which changes are accepted.
Choose a Table or View
Use a Table when you want to add and edit your own records. Save a View when you want to keep a filtered list, calculation or summary and rebuild it from its sources later.
A Dataset is the saved collection of rows and columns behind either tool. Use Definitions to describe what your fields mean and connect those definitions to the actual columns.
Create a Table
For an Orders Table, start with orderId, customerId, status, quantity and unitPrice.
- Open Organizer actions and choose Create → Table. Rename the new Organizer item to Orders.
- Open the Table. Use the arrow labelled Show Table options, then Columns. Add String columns for orderId, customerId and status, and Number columns for quantity and unitPrice.
- Open a column header’s menu to change its name or Type. Review any conversion warning before accepting the new type.
- In Table options, open Primary Key. Select orderId and choose Create Primary Key. This tells Datavju which value identifies each row. Existing key values must be unique and filled in; you can also create the key while the Table is empty.
Choose column types
Select a type for the actual value, rather than relying on its name or how a sample looks.
- String - Text, including identifiers and line breaks. Use orderId = O-101 or a postcode with leading zeros. A date-looking String stays text until you change its type.
- Number / Boolean / Null - Number stores numeric values. Boolean offers True, False and NULL in record editors. Null represents explicitly empty values. Zero, false, an empty String and NULL have different meanings.
- Array / Object / JSON - Store ordered lists, named properties or structured JSON values. Use the embedded tree editor for nested fields; see JSON Builder.
- Date / DateTime / DateTime TZ - Date is a calendar day. DateTime is local wall-clock time. DateTime TZ is an instant, displayed in the browser’s timezone and stored canonically in UTC. Its editor initially selects the browser’s timezone; there is no saved viewer-timezone setting.
- Money - An exact decimal amount plus an explicit currency. Set Default currency for new values if you commonly enter one currency. It does not exchange currencies or round the stored amount to cents.
- Duration - A value made from calendar and elapsed-time parts. Use Value, Unit and Add part. A month remains different from 30 days; Clear sets the value to NULL.
- Password - A masked credential field with protected storage. New input replaces the credential; Clear removes it. Use a separate readable key for the record. Ordinary reads and exports do not return the credential.
Add and edit records
This example inserts an order, then changes its status without changing its identifier.
- Open Table options → New Row. Enter orderId O-101, customerId C-01, status Open, quantity 2 and unitPrice 40.
- Choose Add New Row. You’ll see the saved record in the grid. If a rule prevents saving, correct the values in the form and choose Add New Row again.
- Select O-101 to open Row Details. Change status to Shipped, then leave the field. Row Details saves accepted edits as you make them.
- Close Row Details and reopen O-101. Check that status is Shipped and quantity is still 2. Use Previous row and Next row to inspect neighbouring records.
- For one field, double-click its cell or right-click and choose Cell Details, then Edit value. Your accepted change saves to that record.
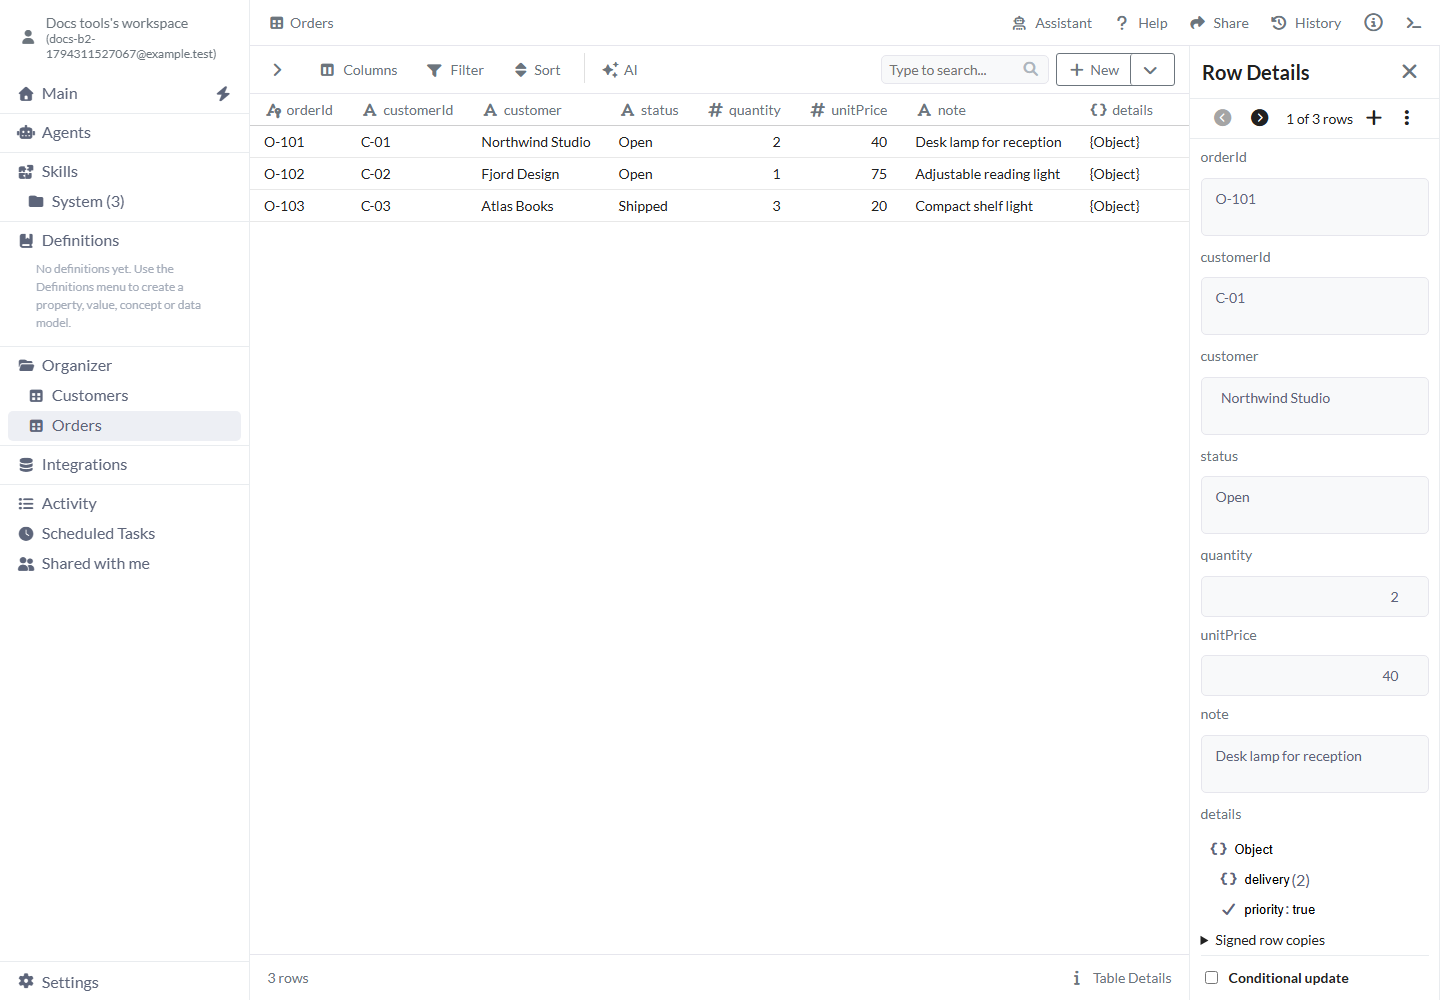
Select a row to inspect and edit its fields in Row Details.
Primary keys and generated identifiers
Choose the column or combination of columns that identifies each record before editing saved rows.
- Primary Key - Select one or more columns, then Create Primary Key. Every combination of values must be unique and filled in. For order lines, you might select orderId and lineNumber together. Delete Primary Key removes the key rule and keeps your records.
- Add Row Number - Off by default. Turn it on to display each row’s position in the result. For an identifier that stays with a record, choose Primary Key or add an Autonumber column.
- Insert default - String column menu: None by default. Choose Random UUID and Save insert default to generate an identifier when a new insert omits that field. Supplied identifiers are kept, and existing records keep theirs.
- Autonumber - Number column menu: off by default. Enable it, set Start at and Increment by, then Save Autonumber. Leave the generated field empty in New Row. Your existing values stay saved; later records continue the sequence. Generated fields are read-only in record editors.
Find and arrange records
Use these controls to find the records you need. A new Table starts with no filters, sort rules, search text or row limits.
- Columns - Toggle visibility, drag to reorder, or use Show all / Show none. Hidden values are preserved; Row Details names hidden fields rather than presenting them as empty.
- Filter - Choose Add filter, a column, an operator and a value when needed. And requires all rules; Or accepts any rule. Operators follow the selected type. String Contains, Starts with and Ends with treat % and _ as literal characters. Is in accepts a typed list and compares String values exactly, including case.
- Sort - Choose Add sort column and its direction. Additional columns break ties in rule order. For unitPrice, 0 to 9 is ascending and 9 to 0 is descending. Sorting does not rearrange saved identifiers.
- Search - Type in Type to search… to narrow the displayed records. Clear the text to see the wider result again. For a particular identifier, use Filter with Equals.
- From Row / To Row - Leave both fields blank to use the full result. Enter a starting and ending row number to show a slice. Add sorting first when you want the same records in that slice each time.
- Normalize - Add a source column and define rules to clean its displayed values, for example trimming spaces. Turn on Create normalized output column to keep a separate cleaned field. The preview updates as you change the rules, while your original values stay saved. Choose Type separately when you want to change the column’s declared type.
Column settings and presentation
Open a column header’s menu to name the field, choose its type or format, and inspect its values.
- Name / Type - Rename the column or select its declared type. A primary-key column cannot change type while the key uses it. Lossy conversions show counts; Show N values as empty accepts the projected empties, while Cancel keeps the old type. DateTime ↔ DateTime TZ requires Timezone for conversion and Save.
- Required - Off for an ordinary newly added column. Enable it to require a non-null stored value; existing rows must satisfy it. Primary-key columns are already required.
- Materialize column - Store this field as a database column when a key or tool requires it. Use Dematerialize column to remove optional database storage. Datavju keeps the storage required by keys and types such as Money and Date.
- Change format - For Number, select Number, Percentage or Currency, or No formatting. Numeric formats start at two decimals; use Increase decimal places / Decrease decimal places to adjust. Currency selects the displayed denomination for a plain Number; it does not give the value Money semantics.
- Column details - Inspect declared type, summary and Top Values. Top Values shows up to 50 values in descending count order. It is a summary, not a complete distinct-value export.
- Delete Column - Remove the column. If Datavju reports that a key or another item uses it, update that item first. To leave the data saved and reduce what you see, hide the column in Columns.
Link records in another Table
Give Customers a primary or Unique key first. Choose a stored Table in the same workspace; refreshable results are unavailable as parent Tables.
- Open Orders → Table options → Foreign Keys. Choose Customers under Parent table.
- Choose the Parent key. For each key field, choose the matching field in Orders—for example, customerId.
- Choose Validate to check existing orders, then Create foreign key. If an order refers to a missing customer, correct that customerId and try again.
- Open an order’s Row Details. Links shows the referenced Customer. Use Change or Link to pick a record, type to narrow choices, and use Next records for another page. Selecting it fills the ordinary row fields and follows their normal save behavior.
Validate stored values
Use constraints to prevent records that break your rules. Choose a rule under Constraints, configure it, select Validate, then Create for that rule.
- Unique - Choose fields whose combination must be distinct, such as externalOrderId. Rows with a NULL value in that combination can repeat. Enable Required on the field when every record needs a value.
- Check - Set a rule for each row, such as quantity greater than 0. Choose Match all conditions to require every comparison or Match any condition to allow alternatives. Enable Required as well when the field must be filled in.
- Exclude - Prevent two records from matching all the selected comparisons. For bookings, choose Date / time range and its Overlaps comparison to prevent double-booking. Each range includes its start and ends just before its end, so adjacent bookings can meet.
- Remove constraint / Remove foreign key - Review the selected rule and confirm its removal. Your records stay saved; future changes use the remaining rules.
Save only when a condition still holds
Enable Conditional insert in New Row or Conditional update in Row Details when a save should depend on the current records. Both start off. For example, require an order’s current status to be Open before changing it. Add the required filters, then choose Save Changes for a conditional update. If the check fails, the form keeps your entries and names the condition to fix. Use Add table or Records → Related to this record when the check needs linked records.
Worked examples
The first example filters complete order records. The second changes values inside one order’s Object field.
Example: save an open-orders View
Start with O-101 Open at 40, O-102 Open at 75 and O-103 Shipped at 20.
- Open Filter → Add filter. Select status, Equals and Open. The current result contains O-101 and O-102.
- Open Sort → Add sort column. Select unitPrice and 9 to 0. O-102 appears before O-101.
- Open the arrow beside New and choose Save as View. The new View stores the two-row result and the query recipe.
- Return to Orders and clear the filter when you want to see all three records again. The filtered result did not delete O-103.
Three source orders. The Open filter keeps O-101 and O-102.
[
  {
    "orderId": "O-101",
    "customerId": "C-01",
    "status": "Open",
    "quantity": 2,
    "unitPrice": 40
  },
  {
    "orderId": "O-102",
    "customerId": "C-02",
    "status": "Open",
    "quantity": 1,
    "unitPrice": 75
  },
  {
    "orderId": "O-103",
    "customerId": "C-03",
    "status": "Shipped",
    "quantity": 3,
    "unitPrice": 20
  }
]
Example: keep delivery details together
Add an Object column called details. In New Row or Row Details, expand Object and add delivery details such as city: Berlin and days: 3. Later, expand delivery and change city to Hamburg, then add a String property carrier with value Post. Reopen the row to see the updated city alongside the saved days and carrier. See JSON Builder for the complete steps.
The saved details value after changing the city and adding a carrier.
{
  "priority": true,
  "delivery": {
    "city": "Hamburg",
    "days": 3,
    "carrier": "Post"
  }
}
Save, share and use Table data
Row edits save to the Table you’re using. Open the arrow beside New to save or use its current result elsewhere.
- Save as View / Save as View to... - Create a separate result from the current filters, sorting and selected columns, with an optional destination. The source Table remains the source for its saved steps and settings.
- Replace / Insert - Replace changes an eligible existing result or tool source. Insert appends compatible current rows to an eligible target. They have different effects; see Replace before choosing a target.
- Transform / Join / Group and other tools - Create a tool using this data. Choose Transform for a sequence of value/row changes, Join for matching rows from another Dataset, and Group for summaries.
- CSV / JSON - Use the output/download choices to export the current result. Keep types declared when reimporting Money, Duration or temporal values; names alone do not infer those types.
- Enable API - Off by default. Enable it to show API in the toolbar, then open API to configure the endpoint and permitted operations. See API for the endpoint setup steps.
- Use Table Editor - The ordinary grid is the default. The Table editor selector also offers Images and Generate Image Variants for image-oriented data. Those use their own editor configuration and image-generation controls.
- Assistant / AI / History / Share - Open Assistant to ask about or change this Table. Use AI for edits after creating a primary key. Open History to inspect earlier changes and Share to choose who can use or edit the Table. Check the resulting records after an AI change.
Limits and common mistakes
Configure a primary key before editing existing rows, and check the displayed constraints when a change is refused.
- Create a primary key before editing or deleting saved rows. You can inspect the grid before creating one.
- Row Details and Cell Details save ordinary edits as you make them. To reverse a saved change, enter the earlier value again.
- Use Columns and Filter to reduce what you see while keeping your data. Delete Column, row deletion and Delete all Rows remove data.
- Ask for access to both Tables when working with linked records. If a customer is missing, create or correct that customer before linking the order.
- Refresh a saved View after its source data changes. Check charts and Pages that use it when you need those results updated too.
- To retain an accepted copy, expand Signed row copies in Row Details and follow the review steps. Review the row again after changing its content.
- Google sheets export is not available yet. Choose CSV or JSON to download the current result.
Related articles
- Datasets - Understand saved rows, columns and data sources.
- View - Save a reusable result and refresh its recipe.
- JSON Builder - Edit nested Object, Array and JSON values.
- Definitions - Define and bind business meaning.
- Row Review - Review and retain an accepted copy of a record.
- Replace - Update an existing result deliberately.