
Join
Join matches rows from two or more Datasets and places their fields side by side. Use it to add customer details to orders, compare records with the same identifier, or keep track of unmatched rows. You choose the relationship, matching clauses and columns to include, then save the result as a View.
Choose your sources
Start with a Table or imported file, then select the other data you want to match. Datavju calls a saved collection of rows a Dataset. Your editable Join keeps the selected sources and matching rules. Choose Save to create a View of the result; open the source Tables when you want to edit their records.
Choose Join, Append or Merge
Choose the tool that produces the rows or columns you need.
- Join - Match rows through clauses and add their fields side by side. Example: order.customerId = customer.customerId adds country to each matching order.
- Append - Stack similar records as additional rows. Example: combine January orders and February orders into one longer list.
- Merge - Use Merge to combine compatible sets of saved View steps. For matching order and customer identifiers, choose Join.
- Transform - Clean fields, calculate values or filter rows in a sequence. Use it before Join to trim spaces from a key, or after Join to calculate with the matched values.
Create a joined result
Open the data whose rows you want to start with. In this example, start with Orders.
- Open Orders and choose the arrow beside New → Join. The new Join starts with Orders as its base.
- Choose Add Table with the plus beside Orders. Select within starts at All locations; optionally choose a folder. Choose Customers under Select dataset.
- Open the relationship control between Orders and Customers. Its Join type initially reads Inner join. Choose Left join to retain all Orders.
- Choose Add join clause. Select customerId for Parent column, = for Join predicate and customerId for Joined column.
- Check the preview. You’ll see matching customer fields beside each order and NULL for missing customer details.
- Open Columns and hide Customers’ redundant customerId. To keep both key fields, close Columns, double-click an output column header and give it a unique name instead. Choose Save, then inspect the new View.
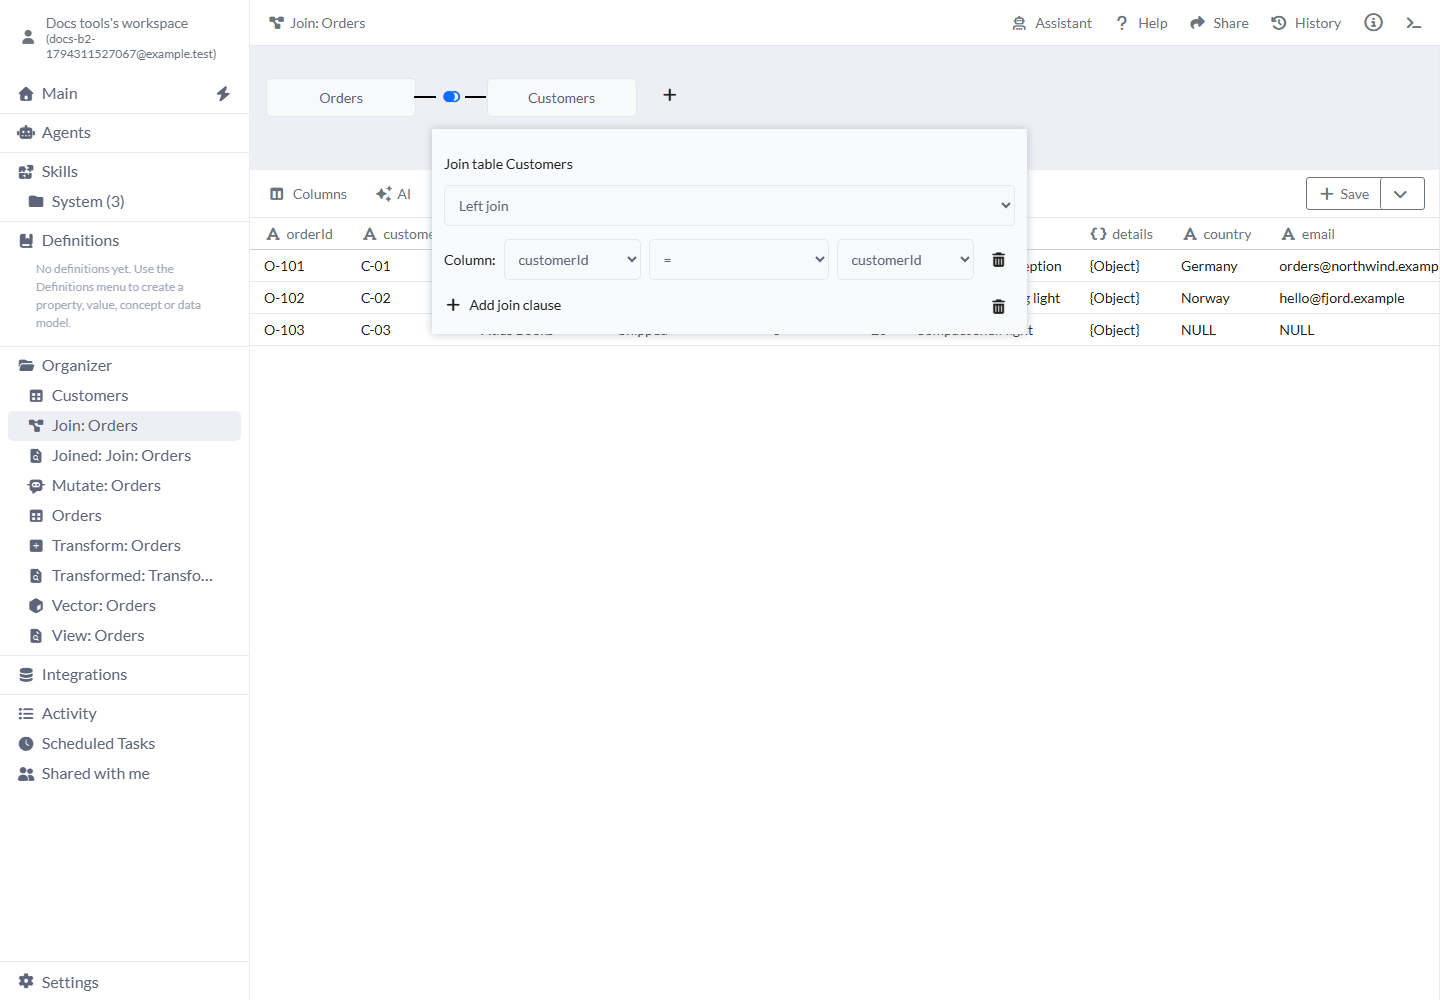
Left join keeps every order, including O-103 with no matching Customer.
Join types
The parent table is the one you added the relationship to. The joined table is the one you selected with Add Table.
- Inner join — default - Keep only matching pairs. With three Orders and two matching Customers, the result has two rows. Use it when a missing relationship should exclude the record.
- Left join - Keep every parent row. Unmatched joined fields are NULL. Use it to keep O-103 even when C-03 is missing from Customers.
- Right join - Keep every joined-table row. Unmatched parent fields are NULL. Use it to retain C-04 even though no order refers to it.
- Outer join - Keep matched pairs and unmatched rows from both sides. In the sample, two matches plus O-103 and C-04 give four rows.
- Cross join - Pair every parent row with every joined row. No matching clause is required. Three Orders times three Customers gives nine rows; use it deliberately for combinations rather than identifier matching.
Clauses and matching settings
Choose the fields and comparison for each relationship. You’ll need a complete clause unless you choose Cross join.
- Parent column / Joined column - Choose the matching field from each table. To match on a combination such as customerId and accountRegion, add a clause for each field.
- Join predicate - Choose =, !=, >, <, >= or <=. = is the usual identifier match. Inequalities are useful for explicit comparisons, but can create many matching pairs. The initial placeholder is Choose predicate type.
- Add join clause - Add another required comparison. Clauses in the same relationship combine with AND, not OR. For example, match customerId and accountRegion together.
- Money / Currency - For a Money column, choose Money for the complete typed amount/currency value or Currency for its ISO currency String. Choose the intended meaning on each side; the default property is the complete Money value.
- Remove clause - Use the clause’s trash button to remove it. Complete the remaining clauses before saving the result.
- Remove relationship - Use the relationship’s trash button to remove that table and any tables joined below it. The source data stays available in Organizer.
Output columns and source selection
Use the input selectors to choose a source. Use Columns and the output headers to arrange the fields saved in the joined result.
- Select within - All locations is the starting choice. Select a folder to narrow the Dataset list, or choose Clear folder to see all locations again. Your folder choice stays available while you work in this Join session.
- Select dataset - Choose the source to add. Use the plus beside a table to join another source to that table. Check the parent table shown by the relationship before choosing its fields.
- Columns - Columns are initially included in the output. Toggle visibility, change order or use Show all / Show none. Hide a redundant joined key when you already retain the parent key.
- Duplicate names - Two visible fields with the same output name block Save. Hiding one excludes it from the saved output; if both matter, give them distinct names. A warning can highlight the conflicting fields.
Worked examples
Add customer information, find unmatched records and understand repeated keys.
Example: add customer country to orders
Orders contains O-101/C-01, O-102/C-02 and O-103/C-03. Customers contains C-01/Germany, C-02/Norway and C-04/France. A Left join on customerId adds Germany to O-101 and Norway to O-102. O-103 stays with country NULL. Hiding Customers.customerId removes only that duplicate output field; the matching clause still uses it.
The two sources.
{
  "orders": [
    {
      "orderId": "O-101",
      "customerId": "C-01"
    },
    {
      "orderId": "O-102",
      "customerId": "C-02"
    },
    {
      "orderId": "O-103",
      "customerId": "C-03"
    }
  ],
  "customers": [
    {
      "customerId": "C-01",
      "country": "Germany"
    },
    {
      "customerId": "C-02",
      "country": "Norway"
    },
    {
      "customerId": "C-04",
      "country": "France"
    }
  ]
}
Left join output after hiding the duplicate Customers.customerId field.
[
  {
    "orderId": "O-101",
    "customerId": "C-01",
    "country": "Germany"
  },
  {
    "orderId": "O-102",
    "customerId": "C-02",
    "country": "Norway"
  },
  {
    "orderId": "O-103",
    "customerId": "C-03",
    "country": null
  }
]
Example: inspect missing references on both sides
Use the same source rows to see which records lack a counterpart.
- Change Join type to Outer join. Keep orderId and both customerId fields visible under distinct output names. Double-click an output header to rename it.
- Inspect the four rows: two matched orders, O-103 with no customer, and C-04 with no order.
- Save the result as a View. Use its Filter controls to isolate empty fields when you want a focused list of missing references.
- Correct records in the source Table. Refresh the saved View when you want its saved Join settings to read those source changes.
Example: understand repeated keys
Suppose Orders has two rows for C-01 and Customers also has two rows for C-01. Join produces four matching pairs. If you need one customer per identifier, correct the duplicate Customers records first. If you need a customer summary, use Group to create it before joining.
Save and reuse the result
Save the result when the preview shows the rows and fields you need.
- Save / Save as View - Create a new View of the full valid result. You can save a valid Join even when it returns no rows; the View keeps its columns and can be refreshed after the source changes.
- Save as View to... - Choose a destination folder for the new result. Saving again creates another result; it does not update the earlier View automatically.
- Replace - Update an existing Table or View, or rebuild the input of a selected Group, Join, Mutate or Transform. The selected tool keeps its settings. Check the destination’s new rows after replacement.
- Group / Join / Transform - Create a downstream tool from the current joined output. Use Group for summaries or Transform for calculations across joined fields.
- Download Model / Create Model Snapshot - Put the Join and its required source Tables in a Folder. Open that Folder and choose Download Model or Create Model Snapshot to reuse the collection. See Models for the export and import steps.
Change a Join with AI
Add the Tables first, then choose AI. Ask for a specific change such as “Use Left join for Customers” or “Hide the duplicate customerId from Customers.” AI can change the type, clauses and output fields of the Tables already selected. Inspect the result after the change. When a Command or Agent asks you to prepare an equality key, open the source Table, choose String and Materialize column as requested, then retry that request.
Limits and common mistakes
When the result differs from what you expect, check the key values and the number of records for each key.
- Inspect repeated keys in the complete sources when you expect one matching record. Each matching pair produces a result row.
- Fill in missing identifiers before using equality to match them. Keep the source identifiers visible while you investigate NULL fields.
- Use Transform to trim spaces or align types when identifiers differ. Match stable identifiers such as customerId rather than a display name that can repeat.
- If a Command or Agent asks for a materialized String key, prepare that column in the source Table and retry. Materialize column stores the field in a form the tool can use for matching.
- Before deleting a source, open Details to see Used By. Remove its relationship from the listed Join first if you no longer need that link.
- After changing an editable Join, use Replace to update an earlier saved View, or choose Save for another result.
Related articles
- View - Read and refresh the saved joined result.
- Table - Edit source keys and prepare stored fields.
- Transform - Normalize keys and calculate joined values.
- Append - Stack records as additional rows.
- Merge - Combine compatible saved View layers.
- Group - Aggregate data at an explicit grain.
- Replace - Update an existing saved result.