
View
A View saves a result together with the steps and settings used to build it. Use one to keep a filtered list, joined records or a summary for a chart or Page. Choose Refresh when you want to rebuild its saved rows from the source data.
What your View saves
Your View keeps its result, the steps that created it and the way you’ve arranged the columns.
- Saved rows - Open the View to read the rows from its last successful save or refresh.
- Layers - Open Layers to see the sources and saved steps, such as a Table followed by a filter or Join.
- Columns and filters - Arrange columns, choose formats and add filters, sorting or search to explore the saved result.
- The same item - Use Refresh or Replace to update the existing View and keep its links. Use Save as View to create another item.
Save a reusable result
Start from the Table, imported file or completed tool result you want to use.
- Use Columns to select the output fields. Add any Filter rules, Sort columns or Search text needed for this result.
- In a Table or View, open the arrow beside New and choose Save as View. In tools such as Transform and Join, use Save or their Save as View menu item.
- Use Save as View to... when you want to choose an Organizer folder. Rename the created item from Organizer when it needs a clearer name.
- Open the new View and check its row count, columns and values. For a large result, use the page controls or download CSV to inspect more than the preview.
Worked examples
Save a list, refresh it after a source change, or keep a joined order list.
Example: keep open orders by price
The source Orders Table contains O-101: Open, 40; O-102: Open, 75; and O-103: Shipped, 20.
- In Orders, choose Filter → Add filter. Select status, Equals and Open.
- Choose Sort → Add sort column. Select unitPrice and 9 to 0.
- Choose New → Save as View. The saved result contains O-102 followed by O-101. Its Layers include the source Table and a Query.
- Select this View as the source of a chart or another tool. Return to Orders when you want to edit the three original records.
The two saved rows, ordered by unitPrice descending.
[
  {
    "orderId": "O-102",
    "status": "Open",
    "unitPrice": 75
  },
  {
    "orderId": "O-101",
    "status": "Open",
    "unitPrice": 40
  }
]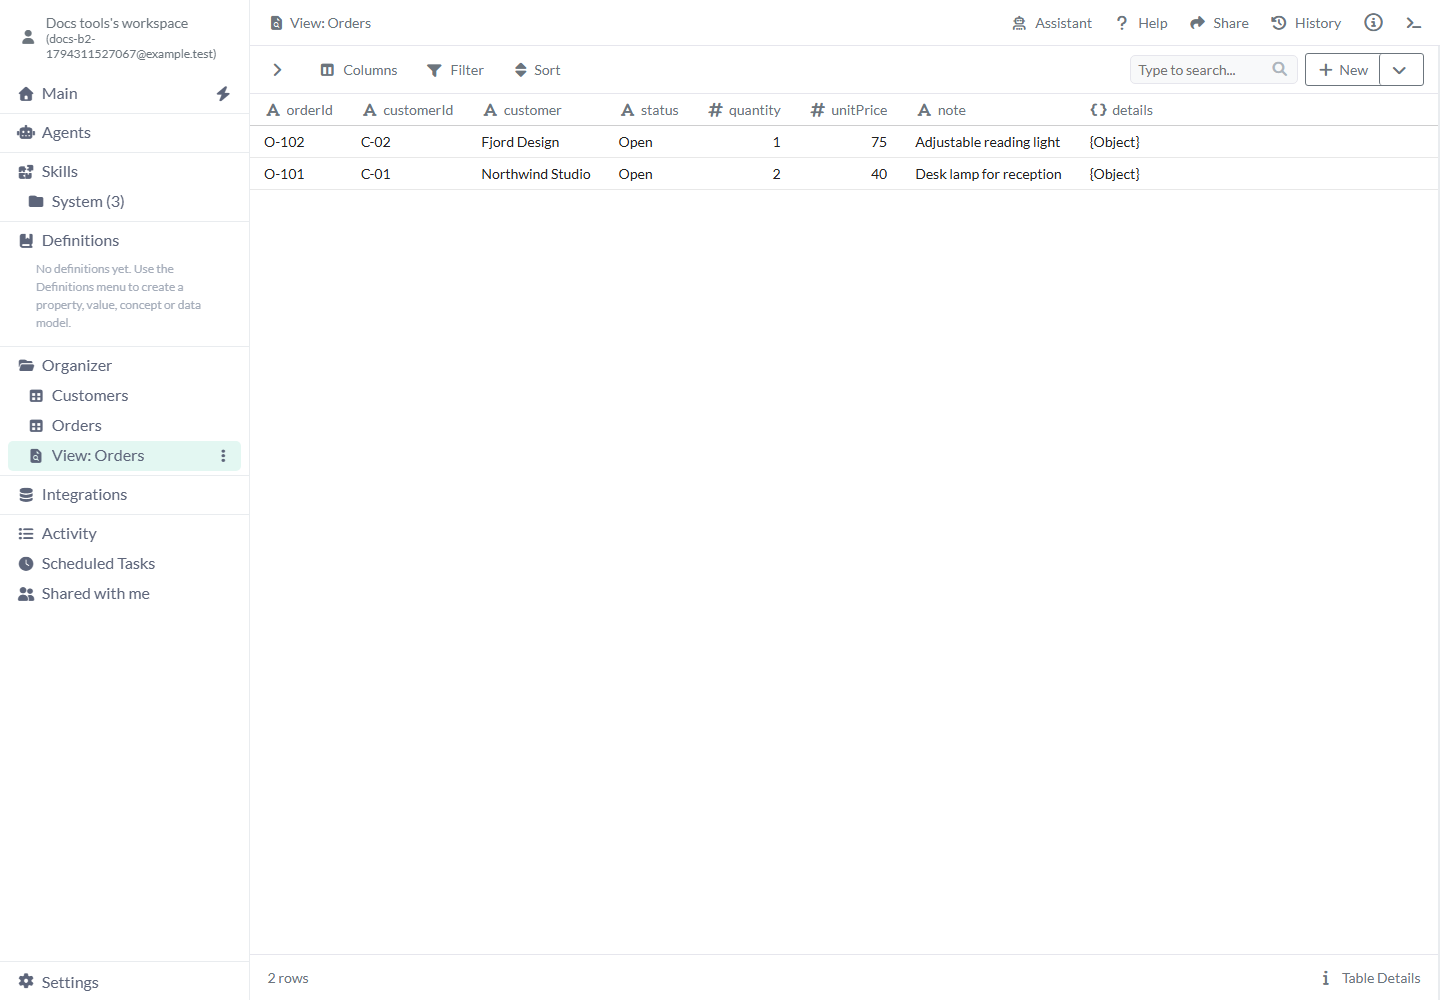
The saved open-orders View before the source status changes.
Example: an order leaves the saved list
After saving the two-row open-orders View, change O-102’s status to Shipped in Orders. The saved View still has its last built two-row result. Choose its own Refresh and it rebuilds to one row, O-101. The source still has three orders. Changing a final View’s column width or format is not this rebuild.
The saved result after Refresh.
[
  {
    "orderId": "O-101",
    "status": "Open",
    "unitPrice": 40
  }
]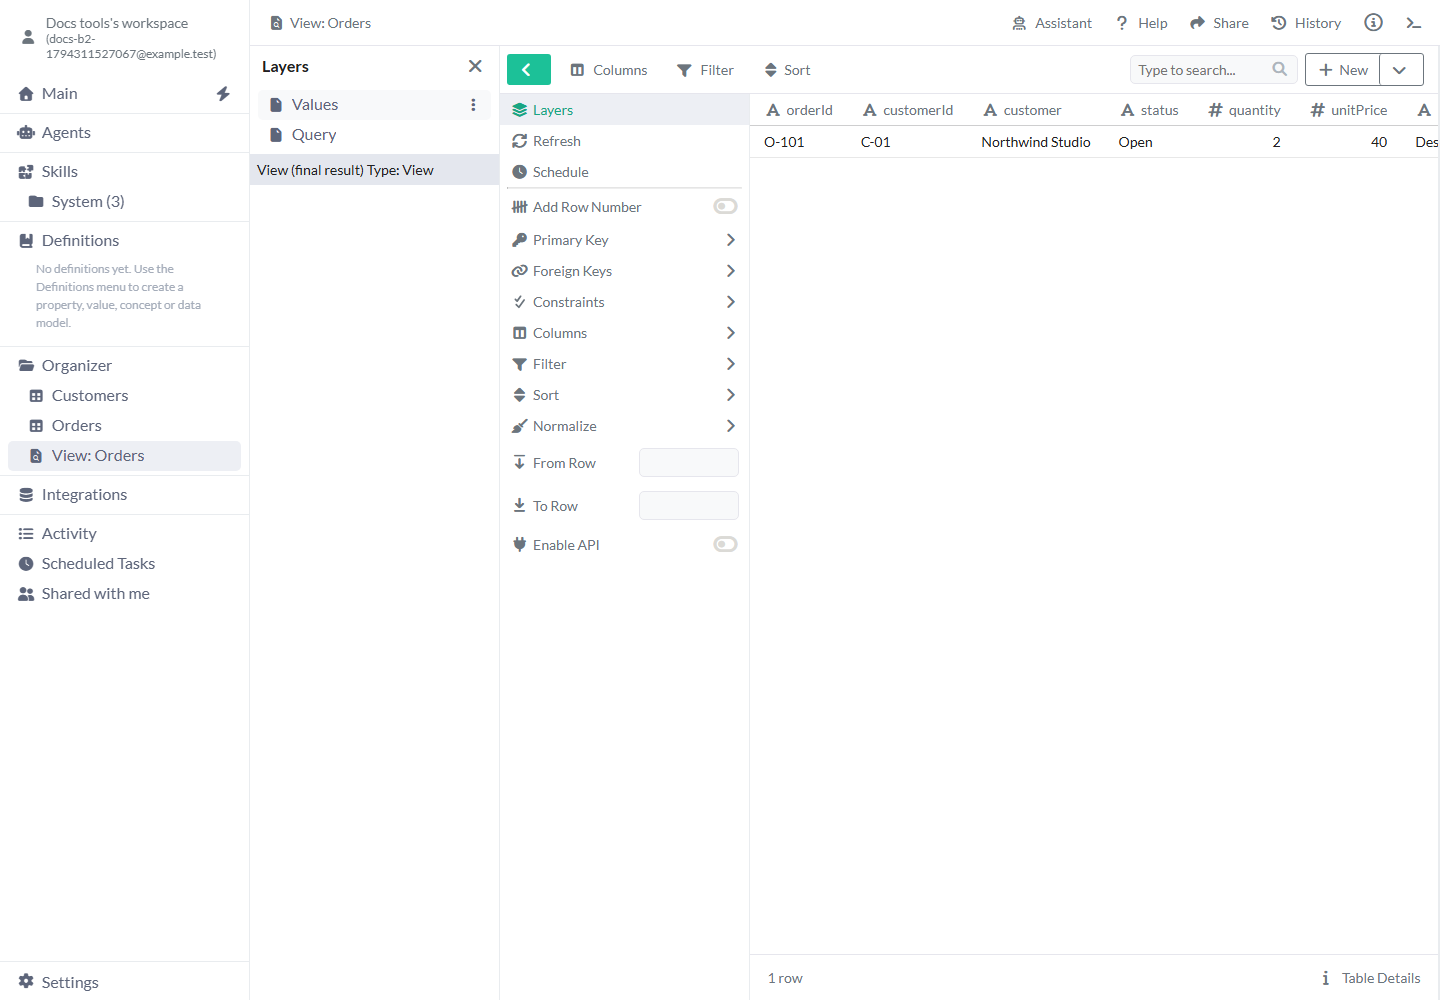
After O-102 changes to Shipped in Orders, Refresh leaves O-101 in this View.
Example: save a joined order list
Join Orders to Customers by customerId with Left join, then choose Save. O-101 and O-102 gain customer fields; O-103 stays with NULL customer fields when its customer is missing. Open the saved View and use Refresh after customer records change. If you change the original Join’s columns or matching rules, use that Join’s Replace to apply the new settings to this View.
Explore the saved result
Use these controls to explore the rows already saved in your View. Open Layers to inspect the steps that created them. To change those steps, update the producing tool and use Replace.
- Columns - Show or hide fields and drag to reorder them. Choose Show all to show every available field. To include a field left out when the View was created, update the producing tool and replace or save the result again.
- Filter - Choose Add filter, select a column and operator, then enter a value if needed. And requires every rule; Or accepts any rule. Remove a filter to see more of the saved rows. Open Layers to inspect a filter saved inside a step. Change it in the producing tool, then use Replace to update this View.
- Sort - Add sort column orders the final result. Rule order gives tie-breaking priority. Numeric 0 to 9 is ascending and 9 to 0 is descending.
- Search - An empty search adds no search condition. Type in Type to search… to narrow the current result, and clear it to remove the condition.
- From Row / To Row - Leave both fields blank to use the full result. Enter the starting and ending row numbers for a slice, and add sorting first when you want the same records each time.
- Normalize - Add a column and choose rules to clean its displayed values. Turn on Create normalized output column when you want a separate cleaned field. Your original saved values remain available.
- Column menus - Rename fields, inspect Column details and choose permitted Type or format settings. Number, Percentage and Currency formatting begin at two decimals. Money keeps its currency and amount. Date, DateTime and DateTime TZ keep their calendar day, local time and exact instant respectively.
- Add Row Number / Primary Key / Foreign Keys / Constraints - Use Add Row Number to display positions. Primary Key and Constraints let you configure supported rules for the saved data. If a control reports that this Dataset is ineligible, follow its message. See Table for key, relationship and constraint setup.
Refresh saved rows
Refresh rebuilds your View using the steps and settings saved with it.
- Update or reimport the source through its Table or file tool.
- Open the View, choose Show Table options, then Refresh.
- Wait for completion and check the rows. Datavju keeps matching column names, order, hidden fields and number formats.
- Open Table Details. Check Saved rows rebuilt for the last rebuild time. Last changed also includes changes such as column settings.
- If you see an error about a column or setting, correct the named source or layer and choose Refresh again. You can continue reading the earlier saved result while you resolve the error.
Inspect the recipe in Layers
Open Layers to follow the steps from your sources to the final result.
- Open Show Table options → Layers. Read the ordered source and operation entries.
- Select a layer. Model shows its saved settings, including the source, filters or transformations used at that step.
- Open the Model dropdown. Choose Data to preview that step. Choose Query when offered for a supported read-only preview.
- For a supported operation layer, choose Save this layer to create a separate result or editable tool from that step. Saving a CSV source layer is not available yet.
- Choose Exit layer mode or the final result entry to return to the saved output.
Choose a preview or live Page result
Model, Data and Query help you inspect a selected layer. Runtime Query is configured on a Page and controls what it reads when it loads.
- Model - The first mode shown when you select a layer. Use it to read the saved settings for that step.
- Data - Preview the selected step. A step that fetches data or generates AI output can run that work, so check its settings before continuing.
- Query - Choose this for a read-only preview when it appears. The current layer menu offers it for supported Query, Join and Group selections. Use Data for a selected Transform layer.
- Runtime Query - In a Page component’s Data Settings, enable Runtime Query when you want supported calculations, filters or joins to use current source records as the Page loads. It starts off. Choose Refresh in the View when you also want to update its saved rows. Use the producing tool separately for AI generation or fetching new external data.
Use your View in charts, Pages and other tools
Choose the saved View as the source wherever you need the same result.
- Charts and Pages - Select the View as the data source. They use its saved rows unless you configure a supported live read such as Runtime Query on a Page.
- Schedule - Open Table options → Schedule to configure recurring refresh. Choose its timing and work through the Schedule controls.
- CSV / JSON - Open the output menu and choose a download format. CSV includes the current complete saved result with the selected columns and applicable filters and sorting. Number formats leave the underlying values numeric.
- Replace - In the producing tool, choose Replace and select this View to update its existing item and links. In Transform, choose Replace and Keep Settings when you also want to keep matching target column settings.
- Insert - Choose New → Insert to add the current rows to an eligible Table. Match the visible column names and check the target’s required fields and keys first.
- Enable API / Share - Enable API to show the endpoint settings. Open Share to choose who can use or edit the View. See API and the sharing controls for the setup required.
- Assistant / History / Table Details - Ask Assistant about the View or request an allowed change. Use History to inspect changes and Table Details to check when its rows were rebuilt.
Limits and common mistakes
When a result looks old or a refresh fails, check the source and the saved steps.
- Inspect the saved row count or download CSV when you need the complete result. Tool previews can show only part of it.
- After changing an original Transform, Join or Pivot, save another View or use Replace to update the earlier View with those settings.
- If you use one View inside another, check Layers to see which saved steps are being replayed. Refresh the particular saved result you want updated.
- Use Runtime Query for supported current-source Page reads. Visitors see the current result when their Page next loads its data.
- For filters that use the signed-in person’s session, use the supported Runtime Query option on a Page.
- If Replace reports that a View would use itself as a source, choose an independent source or save another View.
- Google sheets export is not available yet. Choose CSV or JSON to download the current result.
Related articles
- Table - Edit source records and configure shared query controls.
- Layers - Follow the saved steps from your data sources to the result.
- Transform - Build an ordered sequence of value and row changes.
- Join - Match rows and add fields from another Dataset.
- Replace - Update an existing result or supported tool source.
- Schedule - Set up recurring refresh.
- Page - Bind a saved Dataset and choose its read behavior.