
Append
Append stacks rows from several Datasets into one result. Use it for monthly exports, regional lists or supplier files that describe the same kind of record, even when their column names differ. The first Dataset defines the output columns; you map each later Dataset into that structure.
How Append works
The Base Table supplies the output columns and its own rows. Each Dataset under Select datasets contributes more rows through its Column mappings. A mapping chooses which input field fills an output field: for example, product_code in a supplier export can fill sku in the result.
Append keeps its selected Datasets and mappings in an editable Organizer item. Its preview shows at most five rows from each input. Save builds a separate View using the complete current input results, including their filters and search. Save as Table creates editable rows.
A View saved from this screen keeps the mappings you used when saving. Use its Refresh to rebuild it from those saved steps and current input data. Save again when you want to use changed mappings. The original input records stay in place.
Choose Join to match related rows and put their fields beside each other. Choose Merge to apply a saved View's steps to another source. Choose Append when you want to keep the input rows together, including repeated records.
Combine two Datasets
Start from the Dataset whose columns you want in the combined result.
- Open that Dataset, open the arrow beside New, then choose Append.
- Check Base Table. Start again from a different base if its columns are not the structure you need.
- Under Select datasets, choose the next Dataset. Repeat for additional inputs.
- Inspect Column mappings. For every base column, choose the input column that should supply its value. Choose None when you want an empty value. Exact matching column labels are mapped automatically when you add an input.
- Check Result preview, including a row from every input. It shows at most five rows per input; it is not a total row count. Pay attention to identifiers, dates and numeric values rather than checking only the headers.
- Choose Save. Open the new View and inspect the complete saved result. Keep the Append item when you want to edit its configuration later.
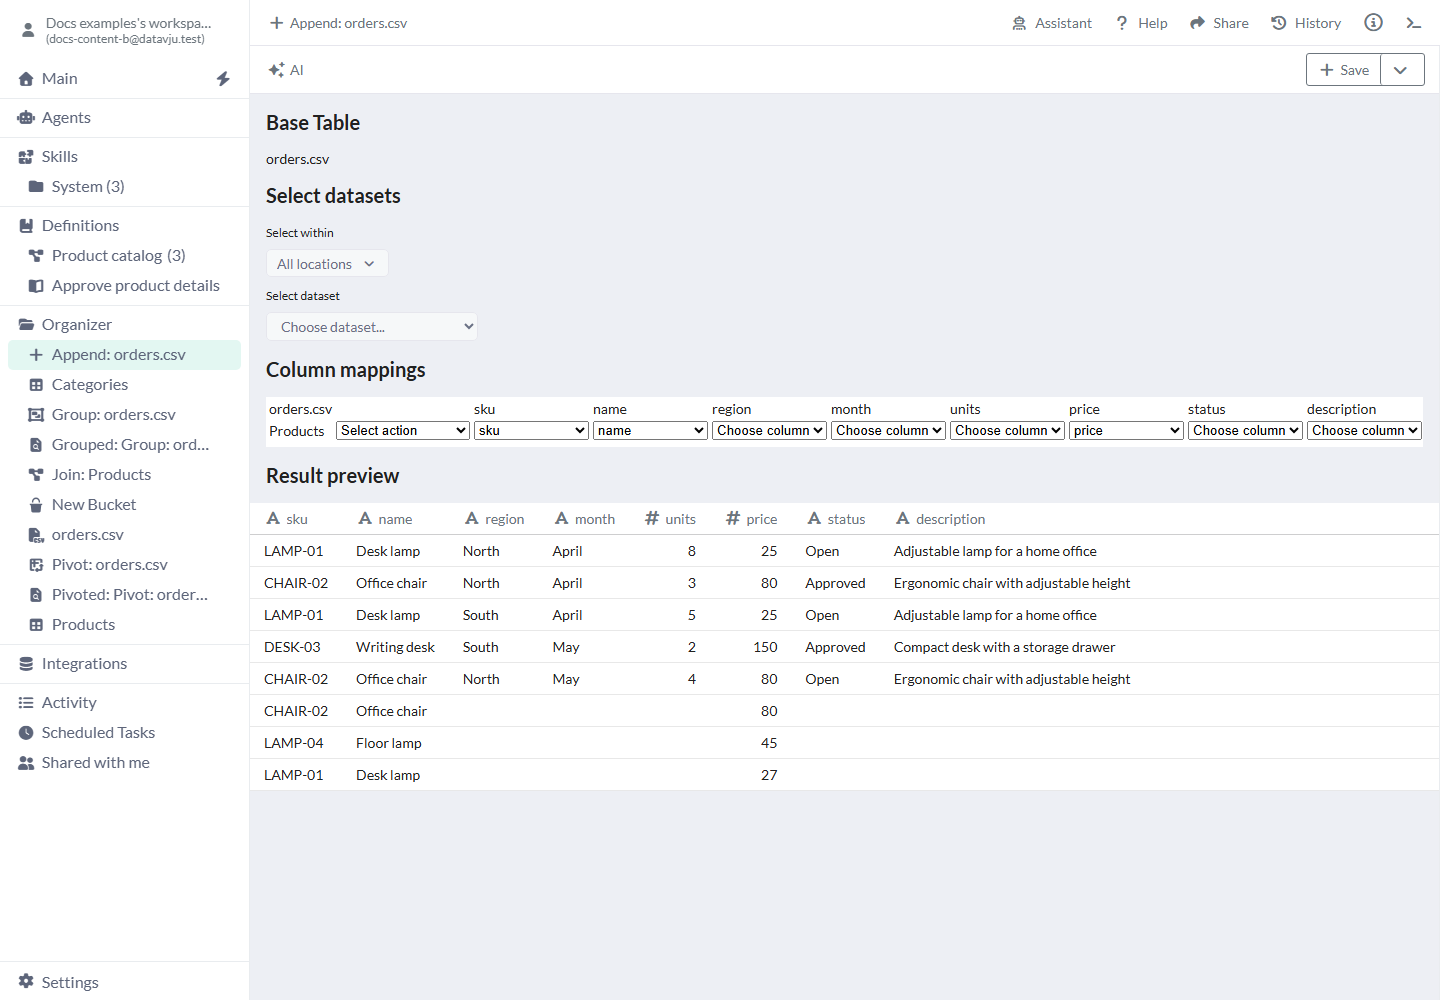
Map each input field to the output column that should contain it.
Settings and output options
Each added input maps into the Base Table's columns. Add required output fields to your base before starting Append.
Base Table and Dataset selection
Base Table is the source from which you created the Append. Create a new Append from another Dataset when you need a different base. Added inputs fill these output columns; prepare additional fields on the base first when they belong in the combined result.
Select datasets starts with no extra inputs. Select within defaults to All locations, listing inputs you can access from Organizer and Integrations. Choose Organizer and a folder to narrow the list, or Integrations and an integration location. For example, choose the folder containing April exports, then choose its orders with Select dataset.
Each selection adds another mapping row under the base-column headers. The picker leaves out the base and inputs you have already selected. Use Remove dataset beside an input to exclude its rows from this Append. Its original Dataset remains available in Organizer.
Column mappings
Choose one input field for each output field, or leave it empty with None.
The bulk choices are in Select action for each appended input. Use Remove Mappings first when you want Map by Name or Map by Index to start from empty mappings.
Mappings include hidden base columns; the preview grid shows visible columns. Check values after using Map by Index: a newly inserted column in an export can shift all later fields into the wrong positions.
- Individual column selector - Behavior: Assigns one input field to a base output field. Exact label matches are the default; None leaves the field unmapped. The manual preview displays a blank; the saved result contains null. When to use it: Map
codetoskuwhen the names differ. - Map by Name - Behavior: Overwrites slots with exact label matches. Existing assignments without a match remain. When to use it: Two exports use the same headers.
- Map by Index - Behavior: Overwrites slots with available input positions. Existing assignments beyond those positions remain. When to use it: Headers differ but the verified column order is identical.
- Remove Mappings - Behavior: Clears all assignments. Fully unmapped rows disappear from the preview, but each input row still becomes an empty row when saved. Use Remove dataset to exclude that input's rows from this Append. When to use it: Clear mappings before rebuilding them from a blank state.
Save menu
The main Save button creates a View. Open its arrow to choose another output or location.
Saving becomes available after you select an additional Dataset. Choose a View when you want to refresh the saved calculation, or a Table when you want to edit the combined records.
- Save / Save as View - Creates a derived View in the Append item's folder, initially named
Appended: <Append name>. - Save as View to... - Opens a location picker for a new View.
- Save as Table - Creates a normal Table containing the current appended result.
- Transform - Opens a Transform based on the appended output for further changes.
- Replace (TBD) - Replacement from this menu is not available yet.
AI editing and shared inputs
AI edits mappings for Datasets you have already selected. Add the required inputs first. For example, ask “Map product_code from April export to sku.” Answer any question in the same AI Edit window, or continue a pending question from Main. Check the saved mappings and preview afterwards.
When someone shares an Append with you, it opens in the same screen. Dataset selection, individual mappings, input removal and AI editing are locked. The bulk Select action mapping menu remains available. You can save a result into your own Organizer.
Transfer and use with Agents
To copy an editable Append to another workspace, keep it and its required inputs in one Folder. Use that Folder's Download Model or Create Model Snapshot, then import the Model in the other workspace. The imported Append uses copies of its inputs. Read any missing-input or mapping error and correct it before trying again.
Agents and external AI tools connected through MCP can configure Append and save its output when they have access to the Append, its inputs and the destination. When an Agent saves a View linked to Append, refreshing that View uses Append's latest mappings. A View saved manually from this screen keeps the mappings used at that save. Check which result you are refreshing when the mappings have changed.
Examples
Keep a month or source column in the input data when you need to identify where each combined row came from.
Combine monthly orders
Use January's two order rows below as the base.
February contains order_id, month, amount and the row B201, February, 80. Map the same-named fields and save. The result contains all three rows, with amounts 40, 65 and 80. January's two rows are still present; February does not replace them.
- A101 - month: January. amount: 40.
- A102 - month: January. amount: 65.
Combine suppliers with different headers
The base contains sku, name, stock with LAMP-01, Desk lamp, 8. The second file contains product_code, title with CHAIR-02, Office chair.
Map product_code → sku and title → name, leaving stock unmapped. The combined result below keeps stock 8 for LAMP-01 and an empty value for CHAIR-02.
Use Transform afterwards if you want to replace the empty stock value with zero.
- LAMP-01 - name: Desk lamp. stock: 8.
- CHAIR-02 - name: Office chair. stock: null.
Keep repeated observations
Two files each contain LAMP-01, 8. Appending them retains two observations. Keep a source or month column when both records matter. If you need one row per SKU, use Group or a deliberate reconciliation process after Append.
Limits and common mistakes
Check the complete saved output after mapping your inputs; its row count can exceed the preview's sample.
- The base columns control the output. Add extra fields to the base first when you need them in the combined result.
- Append keeps repeated records. Use Group for one row per SKU, or choose a deliberate rule when you need to resolve conflicting values.
- The preview is a sample. Inspect the saved result and row count before using it downstream.
- Use the saved View's Refresh when you need to rebuild its result.
- A column with a familiar name can still contain the wrong type or meaning. Check mapped values, especially text identifiers with leading zeroes.
- Shared recipients cannot edit individual mappings or selected inputs. For an independent editable copy, move the Append and its required inputs through the containing Folder's Model export/import.