
Merge
Merge creates a new View by applying another View's saved processing steps to your source View. Use it when you want to reuse a filter or another supported step on data with compatible columns. Choose Join when you want to match related records, or Append when you want to combine their rows.
How Merge works
The Source: is the View from which you opened Merge. A layer is one saved step, such as reading a CSV or filtering its records. Choose another View under Select View to Merge With, then select the step where you want its processing to begin. Merge runs your source's steps, followed by the selected step and the later steps in the other View's main list.
For example, your source contains a June import and its query. Another View contains an April import followed by a query filtering status = Open. Select that View's Query layer to apply the filter to June's records. Selecting Csv would also run the other import.
The Merge item keeps your source and selected step. Save runs the combined steps and creates a separate View. Both original inputs remain available.
Reuse a saved query
Start with a saved source View and a second View containing the processing you want to reuse.
- Open the source View. Open the arrow beside New, then choose Merge.
- Check Source: and Source Layers: to confirm the starting data and saved steps.
- Under Select View to Merge With, use Choose dataset to select the other View.
- Under Select From Layer to Merge Source Layers With:, select a step from the main list. For the filter example, select Query so that processing starts with the filter after your source.
- Check the column comparison below Merge With Layers:. Red crosses mean required labels are absent from the source. Prepare a compatible source before saving.
- Choose Save. Open the new View and inspect its rows, row count and Layers. Use this saved result to check the records produced; the Merge screen compares column names.
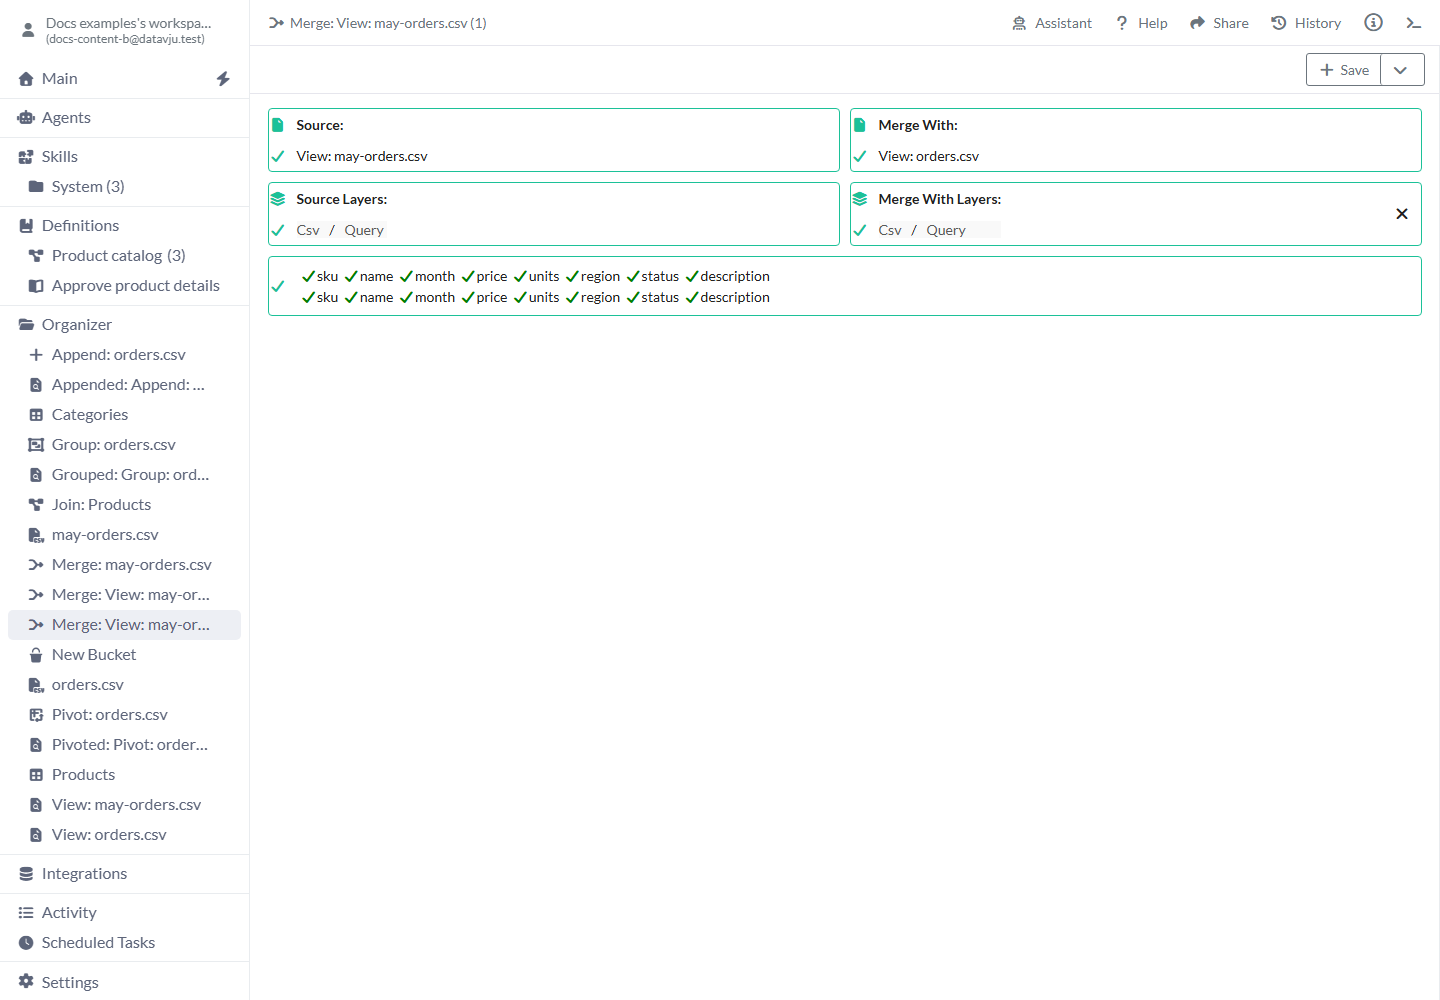
Select the target View and the step where your source should enter.
Settings and output controls
The source is chosen when you create Merge. You then select the other View and the step to reuse.
Source and Source Layers
Source: is fixed when you create Merge. Source Layers: lists that View's saved steps, such as Csv and Query. Start another Merge from the intended source when you want to change this input.
Select View to Merge With
The picker starts with Choose dataset and no View selected. It lists Views in Organizer, sorted by name. Save your required processing as a View first if you see There are no Views in Organizer to Merge With.
After selection, the picker becomes the Merge With: summary. Create a new Merge when you need to choose a different View.
Select From Layer to Merge Source Layers With
No layer is selected in a new Merge. Select a step in the main list to include it and the later steps. Check the columns expected at that step, which may differ from the other View's final displayed columns.
Clearing a saved selection with the cross beside Merge With Layers: is not saved yet; choose another step or create a new Merge.
Merging Append, Group, Join or steps inside expanded input branches is not available yet. Use the corresponding tool on your source when you need that calculation.
Column comparison
Each column name expected at the selected step appears in the comparison. A green check means your source contains that name; a red cross identifies a missing column. Include every expected column before saving. Your source can also have additional columns.
Prepare the column names and types in your source before opening Merge. For example, a numeric price and a text price have the same name but behave differently in calculations. Matching names alone cannot guarantee that all saved calculations work with another source; check the actual saved output.
Save and location
Save and Save as View create a new View in the Merge item's folder. Its initial title is Merged: <Merge item name>. Save as View to... opens the destination and title picker. Saving requires a selected layer and a passing label comparison.
Examples
For the June orders below, the saved open-orders filter keeps B101 and B103 and excludes the Approved order B102.
Apply an existing open-orders filter
Save a target View with status = Open, giving it Csv → Query layers. Use the June orders below in your source View.
Both inputs also have the same month, price and description fields. Create Merge from the June View, choose the target View, select Query and save. The output contains B101/Reading lamp/West/Open/4 and B103/Wall light/East/Open/7. Its layers are Csv → Query → Query; the original June and April records remain available.
- B101 - name: Reading lamp. region: West. status: Open. units: 4.
- B102 - name: Guest chair. region: West. status: Approved. units: 2.
- B103 - name: Wall light. region: East. status: Open. units: 7.
Recognize an unsupported summary layer
A regional summary View contains Csv → Group and shows North, 15 and South, 13 in its grouped result. You want the same summary for the three June orders above.
Selecting that View's Group step shows Layer Type not Supported. Open Group from the June source instead: group by region and sum units to calculate West with 6 and East with 7.
Limits and common mistakes
Check the selected starting step and the actual saved rows before using the result elsewhere.
- Use Merge to reuse saved steps. Use a deliberate record-update process when you need to update existing records by key.
- Check the source's column names, types and meanings before reusing calculations.
- The selected layer is included. Selecting an import layer can run that import again instead of applying only the processing after it.
- Starting Merge directly from a raw CSV is not available yet; save a View of the imported data first.
- Use the saved View's Refresh to rebuild its own saved steps. Save again from Merge when you want an output using a changed selection.