
Integrations
Integrations connects your workspace to external services and saved Computers. Use it to import a supplier catalog, connect an HTTP service for an Agent, or set up the mailbox and merchant account your work uses.
Choose a service
A connection saves the service's address and sign-in details. A query saves a request for data, such as a supplier's product list. Choose the service that fits what you want to do.
- REST API - Bring JSON responses into Tables and Views you can transform and refresh, such as a supplier catalog.
- HTTP API - Send a request using saved sign-in details and read its response. Use this for service actions from Skills, Agents or an external AI client.
- Computer Runtime - Keep files and programs on a saved Computer for scripts, Agent workspace or a Prototype.
- Mail - Connect your sending and receiving mailbox to prepare, send and follow email. SMTP sends messages; IMAP reads your receiving mailbox.
- Stripe - Connect your merchant account for Checkout and checking existing payments.
- Google Analytics / Google Search Console - Connect an account and read the properties, sites and reports you can access.
- Google PageSpeed Insights / Chrome UX (CrUX) - Read a page-performance report or real-visitor-experience data for a URL.
- Better Stack - Read monitoring, response-time and availability data.
- GitHub - Choose a repository and branch to work with its files and folders.
- ETIM - Find product classes and their standard features and values.
- FTP File System Index - List files and folders at an FTP location. Use FTP Acquisition to import an individual file's contents.
- Photoroom - Connect your account for its supported image operations, including background removal.
Add a service
+ Add becomes unavailable when the service is already added. Remove is available when the card has exactly one saved service entry. If you have several copies, choose the exact entry in the sidebar. Right-click a saved entry for Rename or Delete.
- Select Integrations in the sidebar to open the service cards.
- Choose + Add on the service you need. Its entry appears in the Integrations tree.
- Expand the tree and open that service to set up its account, connection or query.
- Open the saved connection or query beneath it to continue working.
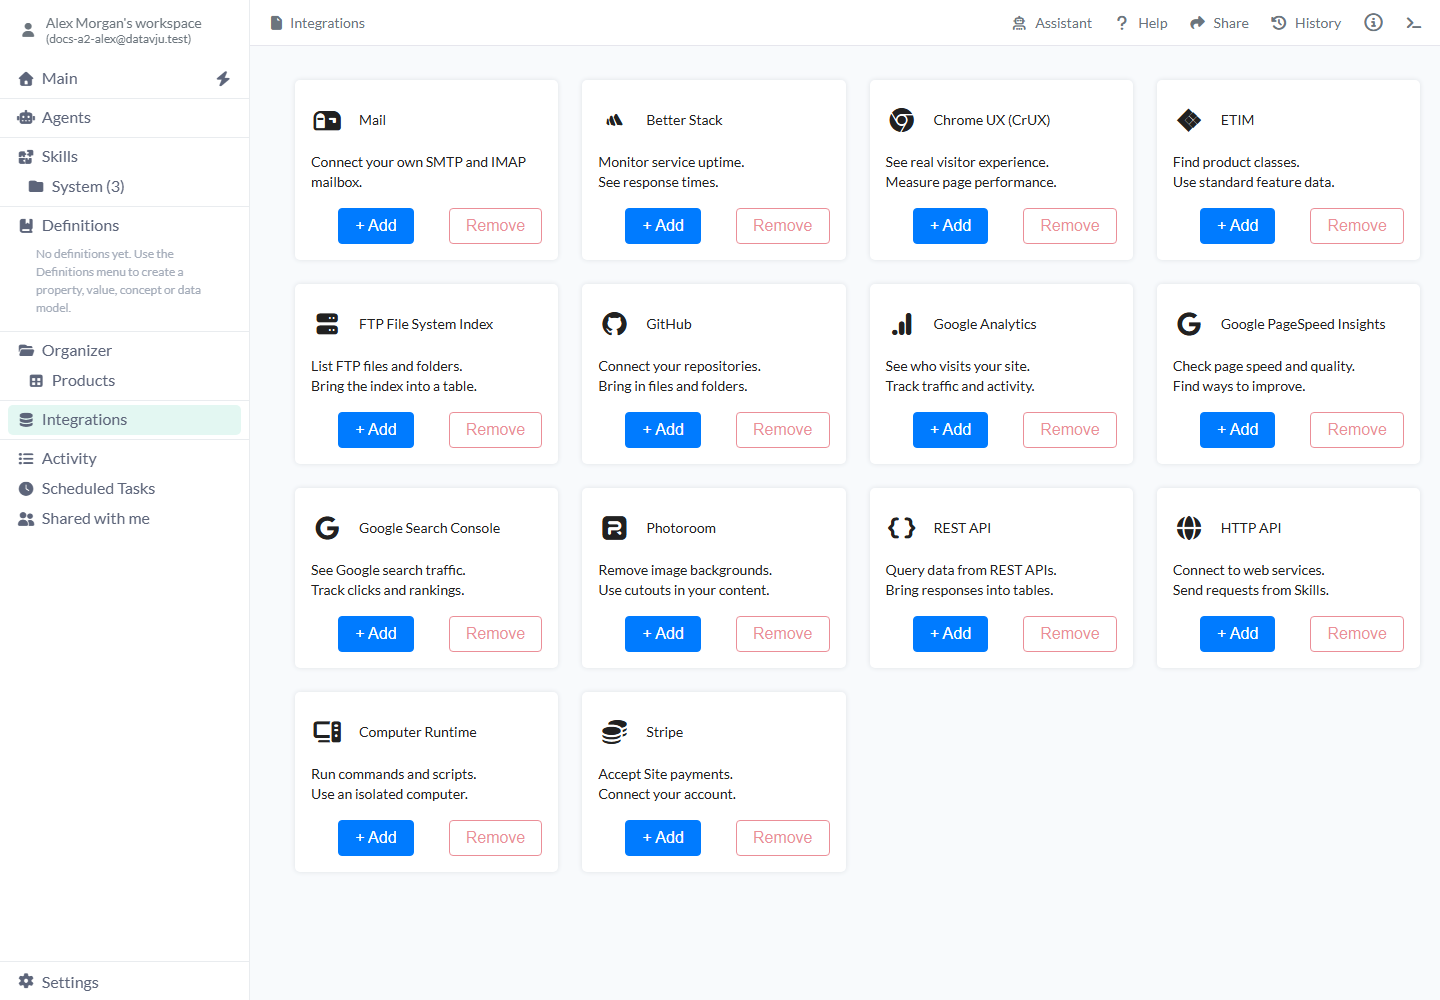
Add the service, then complete its connection or account setup.
Import from a REST API
A View is a saved way to explore data. Open its dropdown or rename action when you want to change its name, and use Transform when you need to reshape the response.
- Add REST API, open it, enter Name and choose Add REST API.
- Enter Base URL for your service. Choose Edit Auth if it needs sign-in, then Authentication → Bearer, enter the token in that setup form and choose Update Auth. Public services can keep None.
- Under Add New Request, choose Source (the HTTP method), enter Path relative to Base URL, and give the request a Name.
- Add ordinary headers and a body if the method needs them, then choose Add Request.
- Open the saved request and its Parameters to change the method, path, headers, body or query parameters. Choose Run request to save the changes and read the result.
- Inspect the rows. To keep a View in Organizer, open the arrow beside New and choose Save as View. In Save new view to, select the destination folder. The new View opens with a name such as View: Supplier products.
REST request settings
New collections start with a blank name and Base URL and None authentication. Set each request's method explicitly.
You get one row from a JSON object or the rows of a JSON array. HEAD and a successful no-content response give an empty result. If the source returns an error, read the error and correct the request. REST handles complete JSON responses, ordinary redirects and decompression.
- Name / Base URL - Name the collection, such as Supplier catalog, and enter the service's shared address. Use another collection for a different base address or sign-in.
- Authentication - Keep None for public data, or choose Bearer when required. Cancel leaves an auth draft; Update Auth saves it. Enter credentials only in this setup form.
- Source - Choose GET to read, POST to submit, PUT or PATCH to replace/update, DELETE to request deletion, HEAD for headers, or OPTIONS for the service's options. Check what the service does before running a method that can change it.
- Path / Name - Enter a relative path such as
/productsand a name such as Supplier products. Both start blank. - Add header - Add a name/value pair, for example Content-Type and
application/json. Use Remove to omit an entry. - Body (text or JSON) - Enter the content for a method that accepts a body. Add Content-Type for JSON text. GET and HEAD use no body.
- Add Parameter - In the saved query's Parameters, add Key, Type and Value. Type starts as Text; choose Number for a numeric parameter. For example, send
limitas Number with value50. Remove omits that parameter. - Run request - Saves an accepted parameter draft and its result. If the request is refused, correct the reported problem in the retained draft and try again.
- Refresh - Repeats the saved method, parameters and body. Check the method before refreshing a write request so you avoid repeating an unwanted change.
Shape and refresh imported data
For example, a response containing a products array can become one row per product. Check both the source and shaped result before using them elsewhere.
- Save the query as a View in Organizer.
- Open Transform from the saved source's New dropdown.
- Use Flatten to columns for object fields or Flatten to rows for a records array, then inspect the preview.
- Choose the available Save as View action for the shaped result.
- When the service changes, refresh the source before its dependent saved results. Use Schedule when that source offers it.
Create an HTTP API connection
Read Status, Last tested and Last error for the saved test result. New manual connections are enabled and Untested. Disable stops tests and requests; Enable returns the connection to Untested. Test it again before relying on its health.
- Add HTTP API and open its entry.
- Enter Name, Base URL and the required Authentication. None is the starting choice.
- Enter required secrets in the dedicated Authentication fields, then choose Add HTTP API Connection.
- On the saved connection, change Display Name or Base URL with Save Settings. Use Update Auth to change sign-in details.
- Optionally enter Test Path (Optional) and choose Test Connection to check its health with a GET request.
Choose HTTP authentication
Use the method required by the service. Save Settings keeps its saved credentials, and replacement fields stay blank until you enter new values.
If Datavju says a credential is shared, edit it from its stated source or use a separate credential for this connection.
- None - Keep this for a public endpoint you can read without signing in.
- HTTP Basic - Enter masked Username and Password. If the service uses an API key as Username with an empty password, select Use an empty password explicitly. Preserve intended spaces; Username cannot contain a colon.
- Bearer token - Enter the token in the secret field. On a saved connection, use New Bearer Token to replace it.
- API key header - Enter the public Header Name specified by the service and the key in its secret value field.
- API key query parameter - Enter Parameter Name and its secret value here. Keep keys out of Base URL, Test Path and ordinary query entries.
- Update Auth - Saves replacements and clears the old test result. For Basic, enter both replacements or choose an empty password. A disabled connection stays disabled.
Send an HTTP request
You read the response on this screen or in the requesting AI tool. To keep its data as Table rows, request an additional save/import step or use REST API for an ongoing data source. Ordinary requests keep the existing connection-test status.
The screen displays the limits: 64 KiB request body, 128 KiB response before and after decompression, 16 KiB response headers, 192 KiB complete result and 30 seconds. Choose an endpoint returning JSON or text within these limits; follow an error when a result is oversized or unsupported. Use the final URL because HTTP API follows no redirects. HTML responses display as text.
- Open the HTTP API Connection and find Request.
- Choose Method. GET is selected initially; POST, PUT, PATCH, DELETE, HEAD and OPTIONS are also offered.
- Enter Relative path. Leave it blank to use Base URL exactly, including its trailing slash.
- Use Add query parameter or Add header for ordinary name/value entries. Remove entries you want to omit.
- For a method that accepts a body, enter Body (text or JSON). Add Content-Type with
application/jsonfor JSON text. - Choose Send request and read the HTTP status, Selected response headers and Response body. If necessary, use Cancel request to stop waiting.
Give an AI tool access
Use Assistant on an HTTP API entry for help setting it up. Give public settings in chat, then follow Open this connection's secret fields to enter credentials in the masked Authentication fields and choose Update Auth.
For a saved Agent, select Send HTTP request under Capabilities → Agent Runtime, the exact saved connection under Integrations, and workspace Read and Write. Choose the corresponding tools and connections when setting up MCP or Agent workspace. MCP connects an external AI client to Datavju; see Workspace settings for its setup.
A Skill can hold a reusable procedure linked to the saved connection. Keep credentials in the connection and give the Agent access to the Skill and the items it needs. Check the returned result before continuing with a dependent task.
Create a Computer
Read Retained disk, Disk limit, the health result, exit code and any error on the Computer screen. Disk grows as needed within its limit; it is created on first use. Check Used by before deletion: sessions and Prototypes sharing a Computer also share its files, programs, login and capacity. A Computer used only by a deleted session is removed with that session; a shared Computer remains.
- Add Computer Runtime, open it and enter Name.
- Keep Network Profile → Web only for permitted web access, or choose Off to turn that networking off.
- Choose Create Computer. Select this saved Computer when starting the intended Agent workspace session, Skill work or Prototype.
- Open the Computer to change Display Name or Network Profile with Save Settings, or choose Test Connection to check health.
- Use Suspend/Resume to stop or start compute, and Disable/Enable to control availability.
Set up a mailbox
Choose Assistant for help beside the mailbox. You can ask it to inspect settings, prepare or preview a message, send a specific saved message, or read its outcome. Enter secrets under Credentials. A sending request can send real email, so name the intended message and recipients and check its outcome before repeating it.
Use Inspect domain DNS for domain observations. DKIM Selector (Optional) chooses the signing-key record to inspect; Trusted Feedback Signing Domains accepts comma-separated domains for verifying provider reports. Related Dataset (Optional) and Related Definition (Optional) let you link existing data or business definitions; both start at None. Read the individual MX, SPF, DKIM and DMARC observations and follow their next steps.
- Add Mail, enter Connection name and choose Add Mail Connection.
- Set Connection Name, Sender Address, Sender Display Name and My Receiving Inbox. The receiving inbox is where the dedicated inbox test looks for its message.
- Enter each SMTP and IMAP endpoint's Host, Port and Username from your provider. The new draft starts with blank hosts/users and port 0; replace these with the provider's settings.
- For Security, choose Implicit TLS (initial choice) or Required STARTTLS, as your provider requires. Both encrypt the connection: Implicit TLS starts encrypted, while Required STARTTLS upgrades the connection before sign-in.
- Under Credentials, choose Password or app password (initial choice) or Existing OAuth access token separately for SMTP and IMAP. An app password is a password your mail provider issues for an application; an OAuth access token is a temporary sign-in credential from your provider. Enter both masked Secret values and choose Save mailbox credentials. Manage OAuth sign-in and token renewal through your credential provider.
- Use Save connection for settings, then Verify mailbox to check the account.
Prepare and send email
Your Compose draft starts empty. Preview it, save the message, then choose whether to send it.
- To / Cc / Bcc - Enter comma-separated addresses. Your saved mailbox is the sender.
- Subject / Plain text / HTML - Enter the subject and message content. Unsubscribe URL (optional) adds the intended link.
- Attachments (owned files) - Select saved CSV, JSON, XML or PDF files. Stay within 100 recipients, 20 attachments and 5 MiB for the complete email.
- Preview message - Read the draft without sending it. Save message keeps its original content for later selection.
- Send test to my inbox - Sends one identifiable test message to My Receiving Inbox and checks its outcome. Review the saved receiving address first.
- Saved Message / Send saved message - Select a saved message and deliberately send it when eligible. Use Read original outcome if you need to check what happened to that attempt, especially after an uncertain response.
- Read verified feedback - Reads supported verified provider reports. Check the reported outcome separately from inbox placement, particularly for recipients outside your receiving inbox.
- Recipient to Opt Out / Record opt-out - Stops mail to that exact address across this workspace's Mail connections. Opt-outs, hard bounces and complaints remain recorded after credential changes or connection removal.
- Disable connection / Enable connection / Remove connection - Stop, restore or remove the connection through the offered controls. Existing message outcomes and suppression records remain available.
Set required email conditions
Use Required dispatch conditions when messages must come from approved source records. The saved conditions apply across this workspace's Mail connections.
Datavju checks current source values immediately before sending. If a queued message no longer meets the saved conditions, inspect its original message and correct the source or policy before preparing the intended next action.
- Choose Dispatch Source Table. It initially shows No required source. Choose a Table with a primary key, then choose Recipient Field from that row or a linked record.
- If the message must use approved content from that row, set Sending Connection Field, Subject Field, and at least one body field under Approved message fields. The fields initially show Not bound; leave them all unbound when you only need recipient and dispatch conditions. When using approved content, match it in Compose and leave out additional Cc/Bcc, attachments and unsubscribe links.
- Optionally set Maximum Attempts Per Source Row; an empty field means no additional limit from this setting.
- Add Only send if conditions for current or related records. Use Current time (UTC) and a Duration for time-sensitive conditions, or Has at most with Is in to count a list of typed values together.
- Choose Save dispatch conditions. Under Message source row, enter every primary-key field to identify the row for the message before saving it.
Connect Stripe and read payments
Enter both secrets when replacing credentials and test again. Use Disable to stop new payments; Enable makes the connection available for testing again. Existing payments stay associated with their original merchant and environment.
To check a payment, find Payment facts, enter Payment identity from the saved Order and choose Inspect payment. This reads the recorded payment. Choose Reconcile with Stripe when you want to fetch Stripe's current information and update that payment and its configured Order fields; you need Write access for this step. Read Payment time (UTC) as the successful Charge's creation time; check your provider for settlement or payout information.
Use the Page's Checkout controls to select the connection, Orders and Prices. Buyers pay on the published Site. Agents can configure Checkout or check an existing payment with the access you select.
- Add Stripe, open it, enter Connection name and choose Add Stripe Connection.
- On the new connection, review its name, enter the exact merchant account and choose Test or Live environment. Test is selected initially. Choose the environment matching your account and key.
- Enter the API key and webhook-signing secret in their masked fields. Choose Save connection, then Test connection. Use the displayed webhook endpoint in your provider's authorized setup.
- Read Untested, Connected, Failed or Disabled health. For a merchant mismatch, check the account ID belonging to that key. A live account also needs permission to accept charges.
Configure data-service queries
Open the relevant service entry after adding its card. Enter sign-in details only in that service's setup form. A Dataset is the data behind a Table or saved result; the query settings below control which data you receive.
Google Analytics
Choose Add Account and complete Google sign-in. In the saved account, choose Add Accounts & Properties Query to find available properties, Add Dimensions & Metrics Query to list report fields, or Add Report Query to read a report.
Valid report changes update automatically. Select property and field choices explicitly where the form starts empty.
- Select Property - Choose the property you can access. In Dimensions & Metrics, All Standard Metrics (no custom) lists standard fields without custom ones.
- Start Date / End Date - Set the report period you need.
- Metrics - Choose at least one measurement, such as the metrics offered by your property.
- Dimensions - Choose how to break down those measurements, for example by a field offered in the list.
Google Search Console
Choose Add Account and complete sign-in. Use Add Sites Query to find your available sites or Add Search Analytics Query for a report.
Valid changes run the report automatically. Choose the site, period and search type before using its rows.
- Select Site - Choose the site the report should read.
- Relative Date - Choose Today, Yesterday, Two Days Ago, Yesterday a Week Ago, Last 7 Days, Previous 7 Days, Last 30 Days, Last 90 Days, This Week, Last Week, This Month, Same Days Last Month, Last Month, This Quarter, Last Quarter, Year to Date or Custom Range. Check the dates produced by the selected period.
- Start Date / End Date - Enter exact dates for a blank/custom period.
- Dimensions - Break down results by Country, Device, Page, Query, Search Appearance or Date. Choose only the breakdowns you need.
- Select Type - Choose the offered search type: Discover, googleNews, news, image, video or web.
Chrome UX and PageSpeed Insights
In Chrome UX (CrUX), enter Query Name and URL, then choose Add Report Query or Add Report History Query. A blank name becomes Report or Report History respectively.
For Google PageSpeed Insights, enter Name and Page URL, choose Check URL, then Add Page when enabled. Read the returned report before using its measurements. To change a saved query, open Parameters, edit URL and choose Submit to apply it and close the form. Reset is not available yet.
- URL / Origin - A new query starts at URL scope. Keep URL for a specific page, or choose Origin for the whole site origin and enter that address.
- Device - Starts with ALL. Choose Desktop, Mobile or Tablet to narrow the report to that form factor.
- Submit - Applies the changed report parameters.
ETIM
Choose the query matching the class information you need, then complete its parameters.
Changes to these parameters update the query immediately. Select a choice before relying on it where the form starts blank. Decide separately how the returned classification should be used in your product Definitions.
- Add Class Search Query - Set From for the starting position, Size for the number of results and Select Language for the text language.
- Add Class Details Query - Enter Code and Select Language. Output Mode (optional) offers Default (raw) for the default class-details output, Compact Definition for a compact class definition, or Feature Value Definition for feature/value definitions.
- Add Class Details Many Query - Enter Codes (Array) as objects containing code and version, then choose the language. For the input shape
[{"code":"EC000001","version":1}], replace the example code and version with those from your actual source. - Add Class Details for Release Query - Enter Code, choose Select Release from Dynamic or the offered ETIM versions 10 through 4, and select the language.
Better Stack
Enter Name and Token, choose Check Token, then Create Integration after a successful check. In the saved token, choose Add Monitors Query.
Select a monitor's ID to view its details. Use the small dropdown beside it for View Monitor Details, View Response Times or View Availability. For the availability/SLA query, set From and To to the dates you want to inspect.
GitHub
Enter Name and Token, choose Check Token, then Create Integration. In the saved token, review Repo (owner/repo) and Branch before choosing Add Repo: the first repository by name and first returned branch are selected automatically after loading. Change them to the ones you intend, then choose Add Files Query in the repository.
Expand the folder tree, select the paths you need and choose Update. Searching the file tree is not available yet; expand its folders to find a path. Open the gear's Files Config to change Exlude File Types (the current label) or Exclude Paths, then choose Update there. Use these exclusions to leave unwanted file types or folders out of the result. If a saved token becomes invalid, use New Token, check it and choose Update Integration.
Photoroom and FTP
For Photoroom, enter Name and API Key, choose Check API Key, then Create Integration. Choose Add Remove Background Query, set Image and choose Remove Background. Reset is not available yet; edit Image when you want another source.
For FTP File System Index, enter Name, Host, User, masked Password and File Path for the root folder. Secure starts enabled. Choose Check Configuration, then Create Integration after success. Open the resulting index to see its files and folders; use FTP Acquisition for an individual file import. To change a saved index, open Parameters, edit the same fields, choose Check Configuration, then Update Integration after success. Use a server that supports Secure for this workflow.
Remove an integration
A linked Skill, Checkout or saved payment can keep a connection in use. If you see Integration removed; cleanup failed, follow the reported cleanup error: the entry was already removed. Check the outcome before attempting removal again. Credentials still used elsewhere stay available.
- Choose Remove on its card or Delete on the exact saved sidebar entry.
- Read the dialog's list of items using the integration. Unlink or change those items through their normal controls, then retry removal.
- Confirm the intended unused service or connection. Datavju checks for new uses again before removing it.
- If the remaining list fails to refresh afterwards, choose Retry integrations list or the offered refresh retry to reload it.
Include a connection in a Model
In a Folder's Model attachment chooser, select the supported connection definitions and Agent connection access you want to include. A Model is a reusable package of data, documents, Pages and Agents. Its recipient supplies compatible sign-in details when importing it.
After import, open each carried connection, fill any blank path/query settings, enable it deliberately and test it. Imported connections start disabled and untested. Keep credentials in their own workspace, and configure the recipient's merchant/environment for Stripe. Use Folder export for these attachments; Site export carries the Site's own contents.
Examples
These examples import two products, read a JSON status response and keep a prototype’s Computer files between sessions. Use synthetic data or a service you are authorized to use.
Save a supplier catalog
Import two products from a JSON endpoint and keep the result as a View in Organizer.
- Use a supplier endpoint returning two products:
LAMP-01, Desk lamp, 100andLAMP-02, Floor lamp, 250under sku, name and weightGrams. - Create a REST API collection, set Base URL, keep None for a public endpoint and add a GET request at
/productsnamed Supplier products. - Run the request and check both rows.
- Open the arrow beside New, choose Save as View, and select Organizer in Save new view to.
- Open View: Supplier products. You can now transform and explore this saved source from Organizer.
The example endpoint returns this JSON array:
[
{"sku":"LAMP-01","name":"Desk lamp","weightGrams":100},
{"sku":"LAMP-02","name":"Floor lamp","weightGrams":250}
]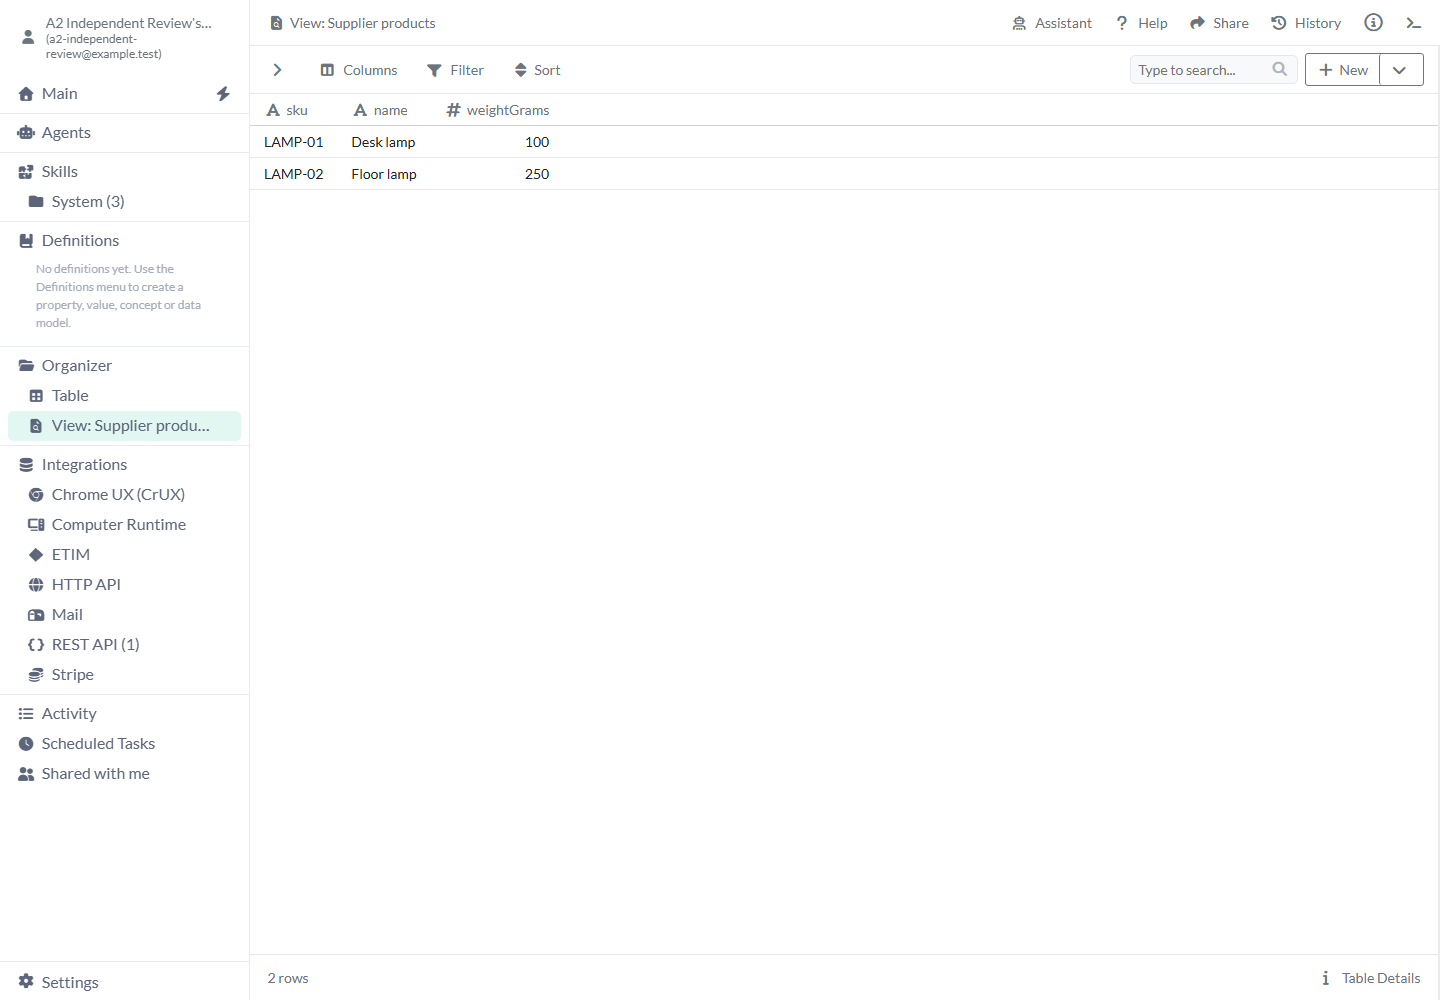
The saved View is available in Organizer.
Read service status
Read a small JSON status response without changing the connection’s saved health result.
- Create an HTTP API connection named Supplier status using your service's Base URL and None authentication for a public status endpoint.
- Keep Method → GET, set Relative path to
/statusand choose Send request. - Read the actual HTTP status and a response such as
status: ready, productCount: 2. Choose Test Connection separately when you want to update the saved health result.
An example response body is:
{"status":"ready","productCount":2}Keep a prototype's Computer
Keep a prototype’s files between sessions by suspending its Computer when you finish working.
- In Computer Runtime, enter Catalog prototype, keep Web only and choose Create Computer.
- Select that Computer when starting the intended Prototype or Agent workspace session.
- When work settles, choose Suspend to stop compute and retain its files. Check Used by before removal so you account for every session or Prototype sharing it.
Limits and common mistakes
Check the external service and recorded result before you repeat a message or a request that changes data.
- Complete the account or connection setup after adding a card, then run and inspect the query or action you need.
- Use REST API for a refreshable data source. For an HTTP API response you want to save, add an explicit Table write or import step.
- Enter credentials only in the service's dedicated setup controls. Keep them out of prompts, ordinary request entries and screenshots.
- Check the external service after a cancelled or lost response before repeating a write. Review a saved request's method before choosing Refresh.
- Open Activity to return to supported created queries or Assistant-created HTTP connections. Open the query, connection or conversation for refresh results and test details.
- Test Mail, Stripe and other services using the account and environment you intend. Check message outcomes, live activation, payments and provider limits through their actual reported results.
Related articles
Use Transform and View to work with imported data, or Skills and Agents to reuse procedures with a saved connection.
- FTP Acquisition: Import an individual file from FTP.
- JSON: Select and import structured file data.
- Transform: Shape nested responses into useful rows and columns.
- View: Save and explore reusable results.
- Skills: Reuse procedures linked to service connections.
- Agents: Select the tools and connections an Agent can use.
- Agent workspace: Work with an external agent on a Computer.
- Workspace settings: Connect an external AI client through MCP.
- Site: Configure and publish a Page using Checkout.