
JSON
JSON turns a structured file into the columns and rows you choose. Use it for exports that contain nested records, lists or objects, such as orders with customer details or products with several tags.
How JSON works
The JSON tool is a file import option under Files. It reads the file’s structure into a tree. Your selections decide which values become columns; repeated records supply rows. Import saves the selected result in the same Organizer item.
You can keep a nested value together or flatten it. After import, use Table controls for filtering and sorting, Transform to prepare another result, or JSON Builder when you want to construct JSON from data.
Import selected fields
Start with a small part of the file and check its preview before adding more fields.
- In Organizer, open the destination folder’s menu and choose File Upload → JSON. Select your file and open the new item.
- Expand JSON using its icon. Expand the list you need, then its object node if it contains records.
- Check the fields you want to keep. Selecting order, customer and total within an orders list gives a column for each field and a row for each order.
- For a nested object or list, open the menu beside that node to choose how to flatten it. Inspect the resulting row count and columns.
- If needed, open Name Transformations to shorten the generated column names.
- Choose Import. Check the saved columns and rows, then reopen the item to confirm the result.
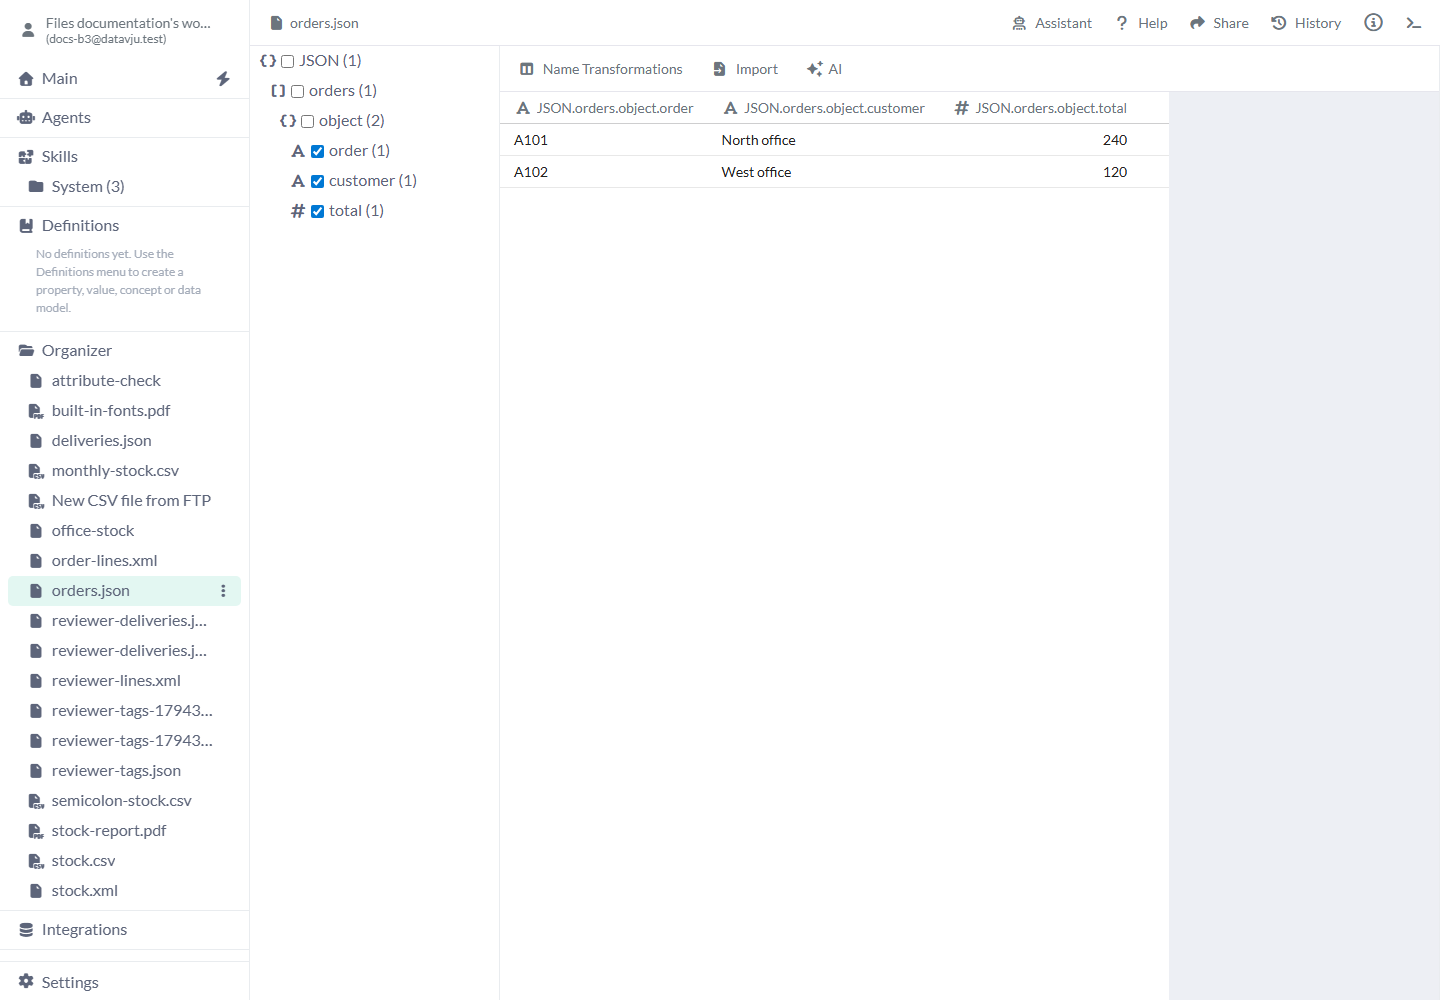
Select fields within the object node to preview the order records.
Tree options
A new import has no checked fields, flattening or type filters. Open the menu beside an object or list to see the options available for that node.
- Checkbox and expand icon - The checkbox includes the path in your output; the icon reveals children. For an orders list, expand orders and object, then select order. Expanding alone adds no column.
- Do not flatten - Default. Keeps the selected object or array as a value. Use it to retain a product’s tags together in one cell.
- Flatten to rows - Makes the selected collection’s entries separate rows. Use it for a list of tags when you want one tag per row. Check how other selected paths repeat in the preview.
- Flatten to columns - Makes entries separate columns. Use it for a fixed array such as ["North",24] when each position has a consistent meaning.
- To row keys - Objects only. Outputs the property names as rows. For {"North":24,"West":8}, the names are North and West.
- To row values - Objects only. Outputs the property values as rows. For the same stock object, the values are 24 and 8.
- All elements - Default for an array. Includes all discovered element types. Use the preview to check the resulting number of rows.
- String, Number, Object, Array, Boolean and NULL - Only types present in the array appear. Choose types to restrict the imported array entries. For ["priority",7,null], String keeps “priority”. This is a type filter; filter order totals later with Table controls.
- Clear selected nodes - Available from the JSON root’s menu. Clears the checked paths and flatten/type-filter choices so you can choose a different result. It does not rewrite your uploaded file.
Name Transformations
Selected paths normally become full column names, such as JSON.orders.object.total. All four inputs start empty.
- Prefix: Remove - Removes a matching beginning. Enter JSON.orders.object. to shorten that column to total. The match is literal.
- Prefix: Add - Adds text to the beginning of every output name. Add order_ to distinguish order totals from other totals.
- Suffix: Remove - Removes a matching ending. For a column ending _raw, enter _raw to drop it.
- Suffix: Add - Adds text to the end. Add _imported when that makes the output easier to distinguish.
- Imported names - These choices set the saved column names. Keep the final names distinct. To change a display label after import, use the ordinary column Rename control.
Worked examples
The selected path and flattening choice determine whether a list becomes rows, columns or a value in one cell.
Import an order list
Expand JSON → orders → object and check order, customer and total. Use Prefix: Remove with JSON.orders.object. if you want the shorter names below. Choose Import to save two rows.
Source file
{"orders":[{"order":"A101","customer":"North office","total":240},{"order":"A102","customer":"West office","total":120}]}Rows after shortening the common prefix
[{"order":"A101","customer":"North office","total":240},{"order":"A102","customer":"West office","total":120}]Split a fixed-position list into columns
Expand JSON → deliveries and select its array node. Choose Flatten to columns for the selected list. The preview has one column for each position and one row for each delivery.
Source file
{"deliveries":[["North",24],["West",8]]}Preview columns and rows
JSON.deliveries.array.1 | JSON.deliveries.array.2
North                   | 24
West                    | 8
Keep only text tags
Expand JSON and check tags. Open the tags menu, choose String, then Flatten to rows. The preview contains priority and fragile as two rows. String alone keeps a filtered list in one cell.
Mixed source array
{"tags":["priority",7,"fragile",null]}Text entries to keep
priority
fragile
Refresh or replace a JSON file
The imported sidebar offers Refresh and Schedule for refreshable JSON.
- Choose Refresh to rerun the saved selections, flattening, filtering and name transformations against the stored upload.
- To supply a newer file, open the item’s Organizer menu and choose Replace File. A compatible replacement keeps the imported item and its column presentation.
- Choose Reimport in the imported sidebar when you need to inspect the current source tree or select additional fields. Review Preview, then choose Import to save the new selections.
- Use Schedule for recurring refresh through the shared scheduling controls. It rereads the stored source; it does not watch a file on your computer.
Use Assistant or AI
Assistant explains the current file structure, selected fields and imported result. Use the normal import controls to change the selection and save rows.
The AI button is available while the JSON import tree is loaded. It can select or unselect paths from your request. Review its selection and preview before choosing Import.
Limits and common mistakes
Use the saved table to check the full result, rather than treating the preview as the whole file.
- No columns means no output paths have been selected. Expand the tree and check the fields you need.
- A selected parent object or list can remain a structured value. Select its fields or choose a flattening option when you need separate columns or rows.
- Arrays can contain several types. Select the intended type and check missing values before using the result.
- The number beside All elements does not yet show the collection’s total.
- A new source must still contain the selected structure and compatible columns for refresh. A failed refresh keeps the last accepted rows and settings; a complete empty array can be a valid empty result.
- Reimport clears an existing primary key while returning to the import tree. Check dependent work before importing a different result.
- Converting an imported String column to Password creates a Table, discards the uploaded source and removes source refresh. Password values are withheld from reads and downloads.
- JSON AI changes import path selections. Use Table and transformation tools for work on saved rows or other import settings.
Related articles
- Files - Choose a file format and compare the ways to bring files into your workspace.
- CSV - Import a file that already has tabular rows.
- XML - Select XML elements and attributes.
- JSON Builder - Construct JSON from your data.
- Table - Filter, sort and work with saved rows.
- Transform - Prepare another result from the imported data.
- Schedule - Repeat supported source refreshes.