
Data generation
Data generates structured JSON from instructions and input, then exposes the result as a table. Use it to extract fields from a request, classify records or generate sample data with an explicit shape. Text produces prose; Data adds a response schema and optional transformations so the result can feed other data tools.
Create a structured generation
Define the response fields before generating so you can check the returned values against named types, such as quantity as Number and destination as String.
- Open the Organizer or destination folder's context menu and choose Generate → Data.
- Select Provider → OpenAI, API → Responses API, and a Model.
- Enter the extraction or generation task in Instructions and its source material in Input.
- Under Response, open the schema editor with the pencil beside the schema name.
- Give the schema a name, define its properties and check their types.
- Return to the item and choose Generate.
- Inspect Table and Raw before saving or passing the output to another tool.
Inputs and model selection
Provider, API and Model start unselected. The current Data catalog offers OpenAI Responses models: GPT-6 Luna, GPT-6.1 Sol, GPT-5.2, GPT-5.5, GPT-5.4, GPT-5.4 mini and GPT-5.6 Terra. A new model loads its starting settings; review the schema and inputs after changing it.
- Instructions - Starting value: Empty. Describes the task and interpretation rules. For extraction, say how to handle facts the input does not supply.
- Input - Starting value: Empty. Supplies the source content. Example:
12 blue notebooks for Berlin. - Text / Array - Starting value: Text. Keep Text for ordinary input. Array input is not available yet.
- Input gear → Source - Starting value: Text Input. Choose Dataset to supply one JSON object per row, separated by newlines; Select Column (optional) supplies only that column’s values. JSON Builder builds structured text. Mutate adds Source Dataset and Task Result; transformations add Transformation Columns.
- Runtime Mode - Starting value: Use Saved Response. Set Use Saved Response before generating and saving a View to reuse stored rows. Set Execute before generation when refreshing a new View should generate again. Later selector changes leave existing Views unchanged.
Model Settings
For the GPT-family Data configuration, Model Settings offers Reasoning Effort and Summary. Effort starts at Default (medium); Low or High changes the requested reasoning effort. Minimal is shown for the other listed models and omitted for GPT-6.1 Sol and GPT-5.6 Terra. Change effort for the task's complexity and inspect the actual result and usage rather than assuming a quality or cost outcome.
Summary starts at No Summary. Auto, Concise and Detailed request the corresponding reasoning-summary presentation where supported. A summary is not a replacement for the structured output.
The dropdown beside Source when editing Instructions also offers PDF Instructions for GPT-4.1, PDF Instructions for GPT-4.1 V2 and PDF Instructions. Choosing a template replaces your current Instructions immediately. Copy instructions you want to keep before choosing one.
Response schema
The schema defines the fields and their types. A new schema is an empty object. Open the pencil beside Response, set Name, then use the table icon to edit its properties or the code icon to inspect the JSON Builder tree.
Choose a short schema Name using letters, numbers, underscores and dashes, from 1 to 64 characters. For example, purchase_request identifies this response format. The name is not a destination Table name.
Add and edit fields
Start with one object and add an Array property for repeated items. Each property you add is required. For a purchase request, add a Number for quantity and Strings for item, color and destination.
Delete Property removes the selected field. The code icon opens the schema as an editable tree. The dropdown offers Article Schema, Hello World Schema, PDF Schema and PDF Schema V2, or Paste Schema to use JSON Schema from your clipboard. Templates and pasted schemas replace the current schema, so copy any fields you need first. The robot icon opens Structured Output Assistant, where you can ask for help describing a schema. Review the schema you use before generating.
- Choose the plus beside Properties.
- Choose the plus beside Array, Number, Object or String.
- Move over the new property and choose its pencil.
- Replace its generated Name with the field name you need. Add a Description, which starts empty, to explain how the model should fill it.
- For Number or String, leave Allowed Values empty for unrestricted values, or add a list such as
low,normal,urgentfor a priority field. - For Array, choose Array Data Type, initially unset: Number, Object or String. Add the repeated fields when you choose Object.
- For Object, add its child properties using the same plus menu. Use the back arrow to return to the property list.
Transformations
Transformations start empty and run in the order you add them, after generation. Open the pencil beside Transformations, use its dropdown to add a transformation, choose Column, then choose Done. Column starts unset; both switches below start off. Choose a column containing an Object or Array.
For an Array such as ["a","b"], Flatten to Columns with Keep Source Column off puts the first element in the original column and later elements in numbered fields such as tags.2. Turn the switch on to retain the original array and add tags.1 and tags.2.
Use Delete to remove a transformation. Each transformation uses the previous one’s output. Add Flatten to Rows before Flatten to Columns when you want fields inside repeated objects as ordinary columns.
- Flatten to Columns - Setting: Column, Keep Source Column. Effect and example: Expands an object into dotted column names, such as
customer.nameandcustomer.city. Turn Keep Source Column on to retain the complete customer object too. - Flatten to Rows - Setting: Column, Only Values. Effect and example: Expands an array into rows, keeping each element under the selected column and retaining other fields. For an object, Only Values takes each property value instead of a one-property object. Only Values does not change array expansion.
Output views and API
Your Data item retains its model, instructions, response schema, transformations and latest generated rows. Save a View of a result you want to keep before generating again. The View captures the settings used for that generation; changing Runtime Mode later leaves that View’s settings unchanged.
The eye menu starts at Table. Choose Raw to read the saved rows as JSON, after any transformations; Schema for your response schema; Transformations for the configured operations; or Data Model for the calculated output columns before generation.
Enable API and API Config use the shared Dataset API settings. API Config and output actions become available after generation produces rows. Read API before serving a Dataset to other software.
Usage shows recorded requests, model groups and token totals for this Data item, with up to 100 recent request rows. Missing measurements are not zero. Saved-response reuse creates no new request; these measurements are not settled charges.
Examples
The sample responses show the intended shape. Compare the generated values with the request before reusing them.
Intended repeated-items response before flattening
{"items":[{"item":"notebook","quantity":12},{"item":"pen","quantity":4}]}Extract one purchase request
The check is that each field has the right type and preserves the input meaning. Wording can vary; unsupported facts should not appear.
- Set Instructions to
Extract the stated item, quantity, color and destination. Do not add information. - Set Input to
Please send 12 blue notebooks to the Berlin office. - Define
quantityas a number anditem,color,destinationas strings. - Generate and compare the actual output with this intended shape:
{"quantity":12,"item":"notebook","color":"blue","destination":"Berlin office"}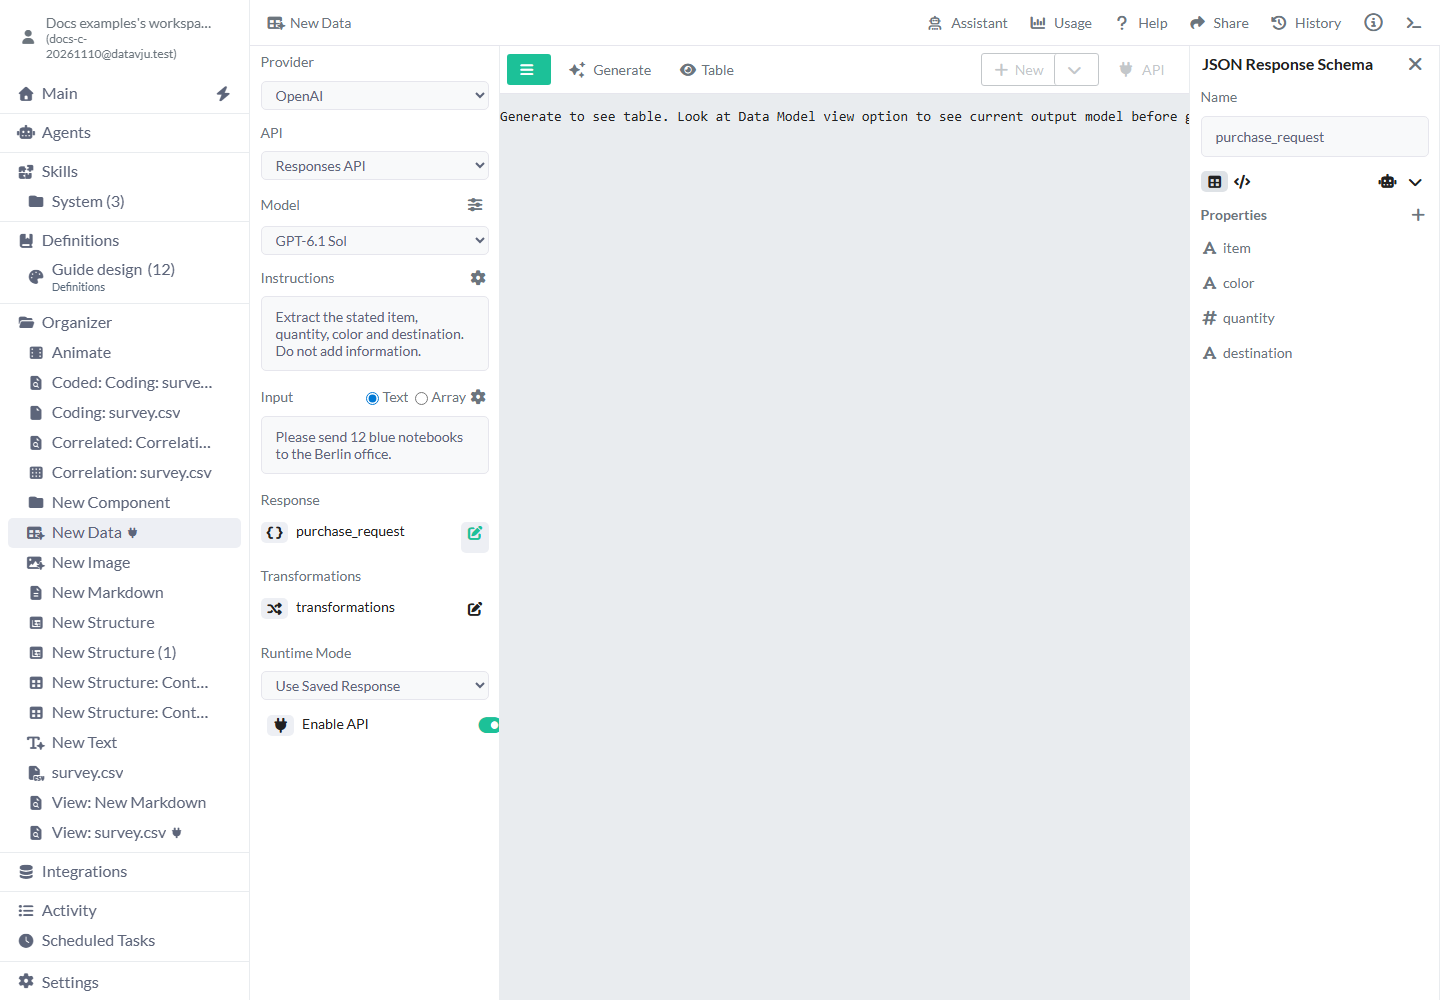
Turn repeated items into rows
Use input Order: 12 blue notebooks and 4 black pens. Define a response containing an items array, with an object for each item.
Compare Raw with the repeated-items sample above before adding transformations.
- Choose Generate, then inspect Raw to verify both items exist.
- Add Flatten to Rows for
items. - Add Flatten to Columns for
itemsafter the row transformation. - Generate again to apply the configured transformations and inspect Table for two rows, with
items.itemanditems.quantityretainingnotebook/12andpen/4.
Generate clearly synthetic test records
Keep the root response as an Object and put the three requests inside an Array so each request can become a row.
- Set Instructions to
Generate exactly three invented support requests for testing. Include a subject and priority. Do not use real people. - Add an Array property named
requests, set Array Data Type → Object, and add String propertiessubjectandpriorityinside it. - Add Flatten to Rows for
requests, then Flatten to Columns forrequests. - Choose Generate and check that Table contains exactly three rows with
requests.subjectandrequests.priority. - Save the reviewed result in a clearly named test View before using it in a Page or workflow.
Limits and common mistakes
- Schema validity proves shape, not truth. Check extracted meaning against the source.
- Use Saved Response intentionally reuses stored rows; it does not run your revised instructions.
- Generation replaces the current Data output. Save important results separately before another run.
- Flattening changes the result shape. Inspect nested fields and row counts before using the rows in a Page or another tool.
- API publication, source permissions and provider access are separate settings.
- After an interrupted request, inspect stored output and Usage before generating again.