
AI Edit
AI Edit changes the item you have open from a short instruction. Use it for a focused table, import selection, Group, Join, Append, Viz or Page edit when that tool offers an AI control.
How it works
You describe a change to the open item. Datavju checks the proposed change, saves it and refreshes the result. Review the item first: a successful request can change it immediately.
Choose Assistant when you want to discuss the current tool before editing, or Main Command when the task involves several workspace items. After an AI edit, use the tool's output controls to save a new result or its publishing controls to publish a Page.
Make a focused edit
Name the exact item, fields and values you want to change so you can check the saved result afterwards.
- Open the item you want to change and review its current settings or rows. Check that you have editing access.
- Select AI in its toolbar. In Story, the Page toolbar's AI targets the Page; an element's sparkle control opens an edit for that selected component.
- Check the window title or target before typing. Examples include Table AI Edit, CSV AI Edit, JSON AI Edit, Group AI Edit and Viz AI Edit.
- Enter the specific change and what must stay unchanged, then press Enter. Use Shift+Enter for a new line.
- If a question appears, answer in the same input and press Enter again. Wait for the run to finish before submitting another edit.
- Check the changed settings and result. Close and reopen the item to check that your changes stay saved.
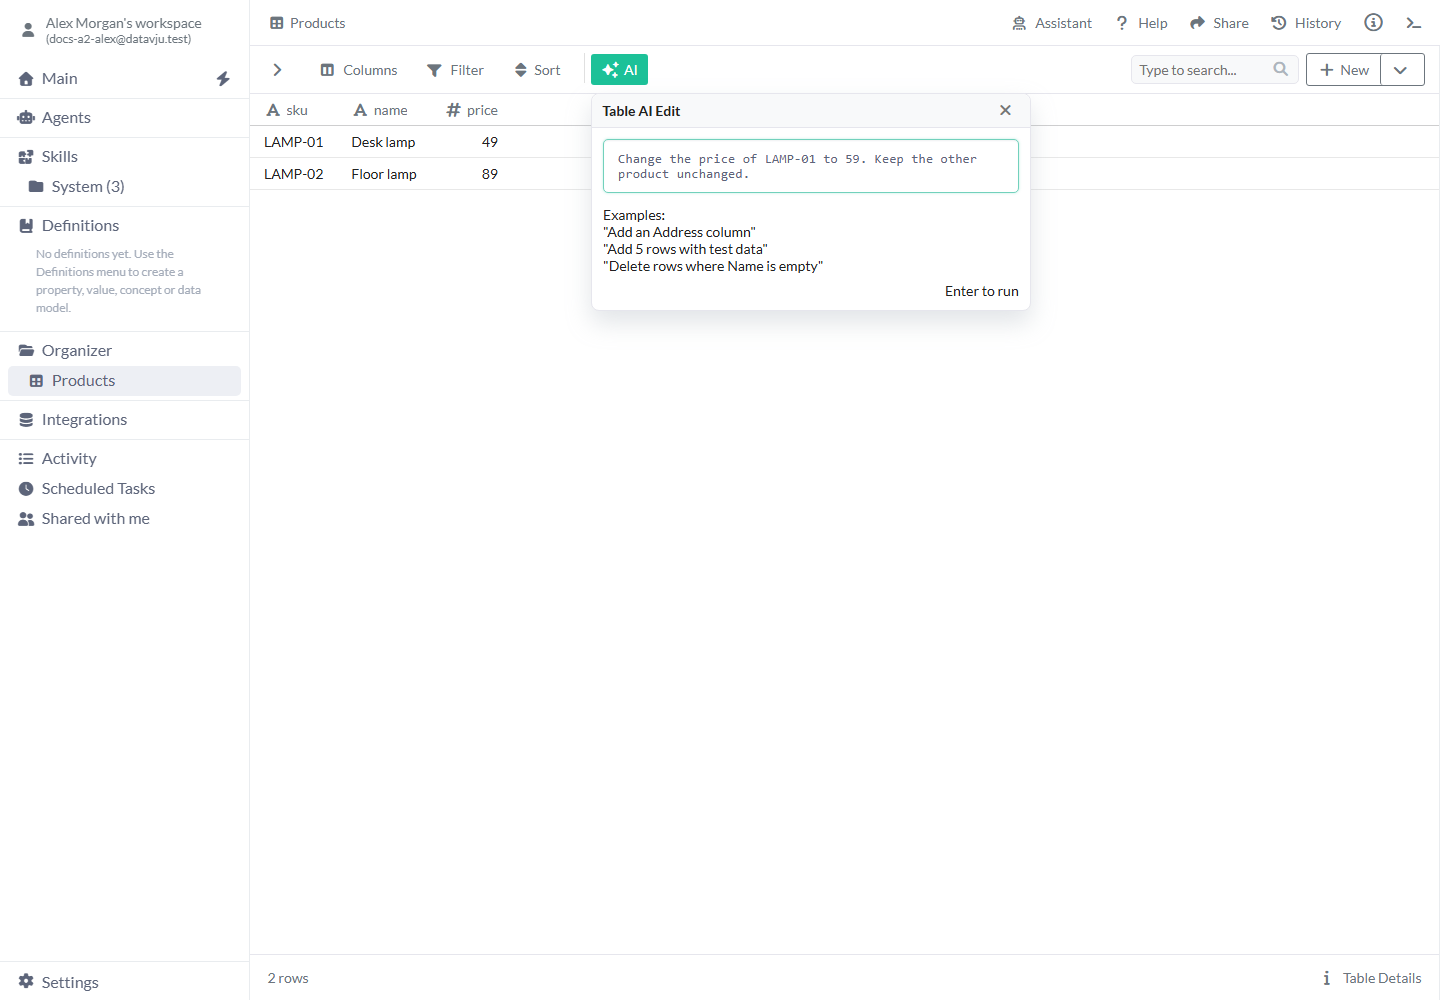
Name the exact product and the values to preserve.
Window controls
Check the window title and examples to see what you are editing, then write your request in the input.
- AI / sparkle control - Opens an edit for the current item or selected element. Read its examples for the kinds of change you can request. If editing is unavailable, read the displayed explanation for what to do next.
- What do you want to change? - The usual empty input prompt. Be explicit about field names, values and target. For example, name a product by its primary key instead of saying "the first product".
- Enter to run - Appears when you have entered text. Press Enter to submit, then wait for the input to become available before entering another request.
- Type your answer... - Replaces the ordinary prompt when the current edit needs clarification. Answer the question rather than starting an unrelated task in the pending thread.
- Window header and X - Drag a floating window by its header to move it and use X to close it. Work can continue after you close the window. On a Page, the toolbar opens an editing menu.
- Response or unavailability message - Read what changed, or what you need to fix before starting. Open the affected settings or rows to check the result.
Tables and imported CSV
First set a primary key: the column or combination of columns that uniquely identifies each row. Open the Table sidebar's Primary Key controls to choose it. Table AI Edit works with up to ten rows from the current table view, so use it for small changes you can check. For a larger task, use Table Assistant or an Agent with access to query the full Table.
For a CSV file, complete Import and set its primary key before using AI Edit. If you have read-only access or still need to import or set a key, the AI control explains the requirement.
JSON import selections
Before importing a JSON file, open AI beside its tree and ask to select or unselect the paths you need. Check the refreshed preview, then use the normal import controls. Use those controls for flatten/filter changes, and open the imported Table to edit rows after import.
Group, Join and Append
A Dataset is the data behind a Table or a saved result. Select the data you want to combine before asking for a Join or Append edit.
After the edit, check the tool's saved settings and preview. Choose one of that tool's available output actions to save the result you need.
- Group - Can start from an empty Group. Name the grouping fields and calculations, for example
Group by Country and sum Revenue. A completed edit saves the Group configuration and refreshes its preview. - Join - Select the participating tables first. Use the visible table and column names to specify join type, matching conditions or output visibility. For example,
Change Orders to LEFT JOIN using customer_id = customer_id. - Append - Select at least one Dataset to append before editing. Ask for mappings among the selected Datasets. If the edit needs another Dataset, select it through Append's controls and answer in the same thread.
Viz
In a Viz, name the Title, Metric or supported chart you want to change. A Metric displays one calculated value, such as total revenue. Use fields already attached to the Viz; see Viz for the available chart and SVG editing tasks.
For a Title, give the text and an optional six-digit hexadecimal color, such as #2457d6. For a Metric, name the attached data field and the calculation, label or number format you want. Settings you leave out stay unchanged. Use separate Vizzes for separate headline values, because Metrics are centred at the same position. If saving fails or another edit causes a conflict, reload the Viz before retrying. Ask for editing access if the shared Viz is read-only.
Pages and selected components
Use the Page toolbar's AI to change the Page's structure and appearance, or an element's sparkle control to edit that element. Name elements as they appear in the Components tree. Use the tree's rename action when you want to change an element's name.
You can edit supported headings, sections, paragraphs, plain buttons and form elements. When asking for a Select dropdown, include its Option choices. Use the Page's data, state, event and Link controls for interactive behavior or advanced data connections. If AI Edit refuses a change, keep the existing element and use the relevant control. Apply visual styles to the Heading, Paragraph or other element containing Plain Text.
Examples
These examples change one product price, group three orders and restyle a Page section while preserving its content.
Correct one product price
Change one price while preserving the other product and both names.
- Open a Products Table with columns sku, name and price, and set sku as its primary key. Use rows
LAMP-01, Desk lamp, 49andLAMP-02, Floor lamp, 89. - Open AI and enter
Change the price of LAMP-01 to 59. Keep LAMP-02 and the names unchanged.Press Enter. - After completion, check that LAMP-01 is
LAMP-01, Desk lamp, 59and LAMP-02 remainsLAMP-02, Floor lamp, 89. If the run asks which product, answer with the exact key in that thread.
The saved result contains these values:
sku,name,price
LAMP-01,Desk lamp,59
LAMP-02,Floor lamp,89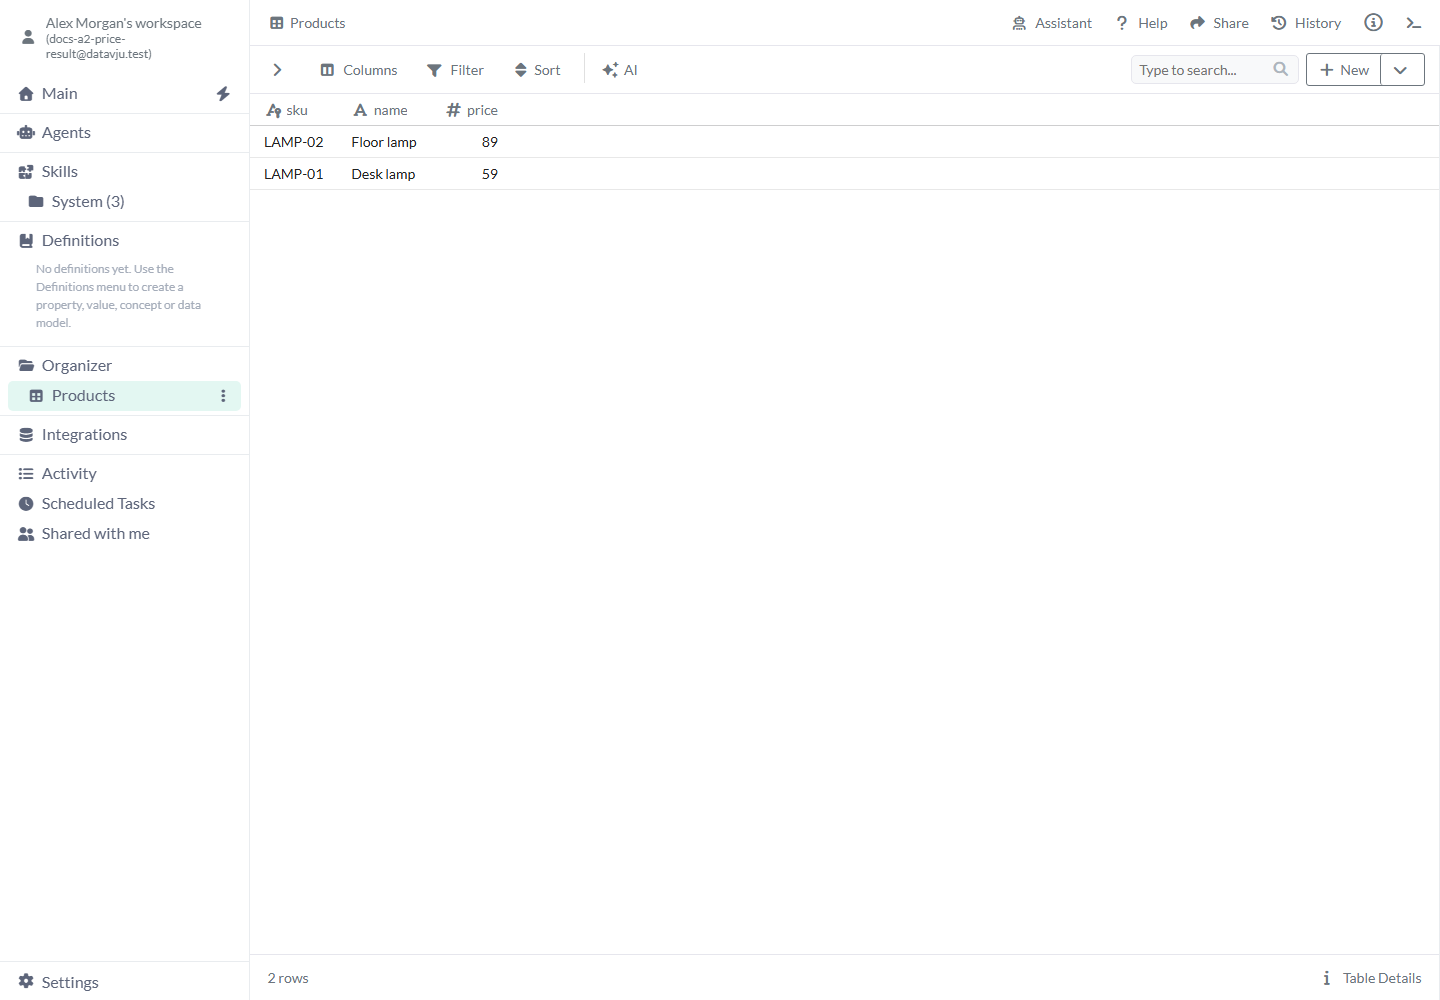
Reopen the Table to check the saved price and the product you wanted to preserve.
Summarize regional orders
Turn three orders into two country totals by saving grouping fields and a sum calculation.
- Open Group from an Orders source containing
DE, 20,DE, 30andFR, 40in Country and Revenue. - Select AI, enter
Group by Country and add sum of Revenue, and press Enter. - Inspect the saved grouping fields and sum calculation. The preview should contain one DE group totaling 50 and one FR group totaling 40. Row order depends on the Group's sort settings.
- Use the normal Save as View flow if you want a named reusable result in Organizer. The source's three orders remain separate source records.
Restyle one Page section
Change a section’s background and spacing while keeping its heading and both paragraphs.
- Open a simple Page containing a Section named Delivery information, with a heading and two paragraphs. Select that Section in the Components tree.
- Open its sparkle edit and request
Set this section background to #f2f6fa and padding to 24px. Keep its heading and both paragraphs. - Check the Section's saved properties and Page preview, including both paragraphs. Use the Page's publishing controls when you want to put the change online.
Limits and common mistakes
Check the target and saved values before retrying an interrupted or refused edit.
- Check the window title before submitting so you edit the intended Page, element or tool.
- Set a Table's primary key first and keep Table AI Edit tasks within the ten-row view you can inspect. Check the requested row and the data you wanted to preserve.
- Use the tool's normal output controls to save another result, and its publishing controls to publish. Choose Agent workspace when you need your own external model settings.
- For a refused data connection, event or state change, open the corresponding Page control and preserve the existing behavior while you correct it.
- After an interruption, reopen the item and check what was saved before retrying. To answer a pending question later, open Main → Recents → Needs attention and select its saved conversation where that tool supports it.
Related articles
Use Assistants to discuss the item before editing, or the tool’s own guide to inspect and save its result.
- Assistants: Discuss and inspect the current tool before changing it.
- Command: Work across the workspace items you can access.
- Table: Configure keys and inspect saved records.
- JSON: Select and import structured source data.
- Group: Save and inspect grouped results.
- Viz: Check supported visual edit operations.
- Story: Edit Page structure, styles, data connections and events.